I’ve just completed the neckband, seen here:
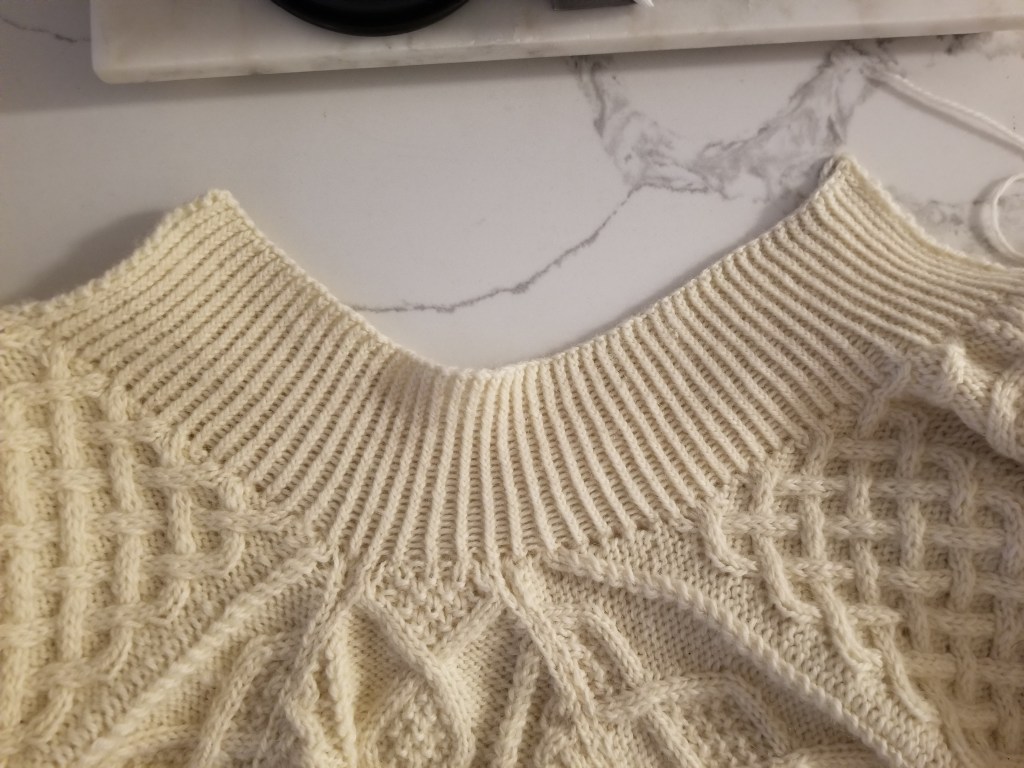
It’s a pretty simple twisted ribbing (so didn’t take too much time)!
Last part is the seaming to close up the whole thing 😩
I’ve just completed the neckband, seen here:
It’s a pretty simple twisted ribbing (so didn’t take too much time)!
Last part is the seaming to close up the whole thing 😩
Once again, it has been some time since my last post!
The separate pieces of the Aran sweater had been sitting around while I procrastinated the seaming.
But with December ending soon, I’m hoping to get it done within the year 🫡
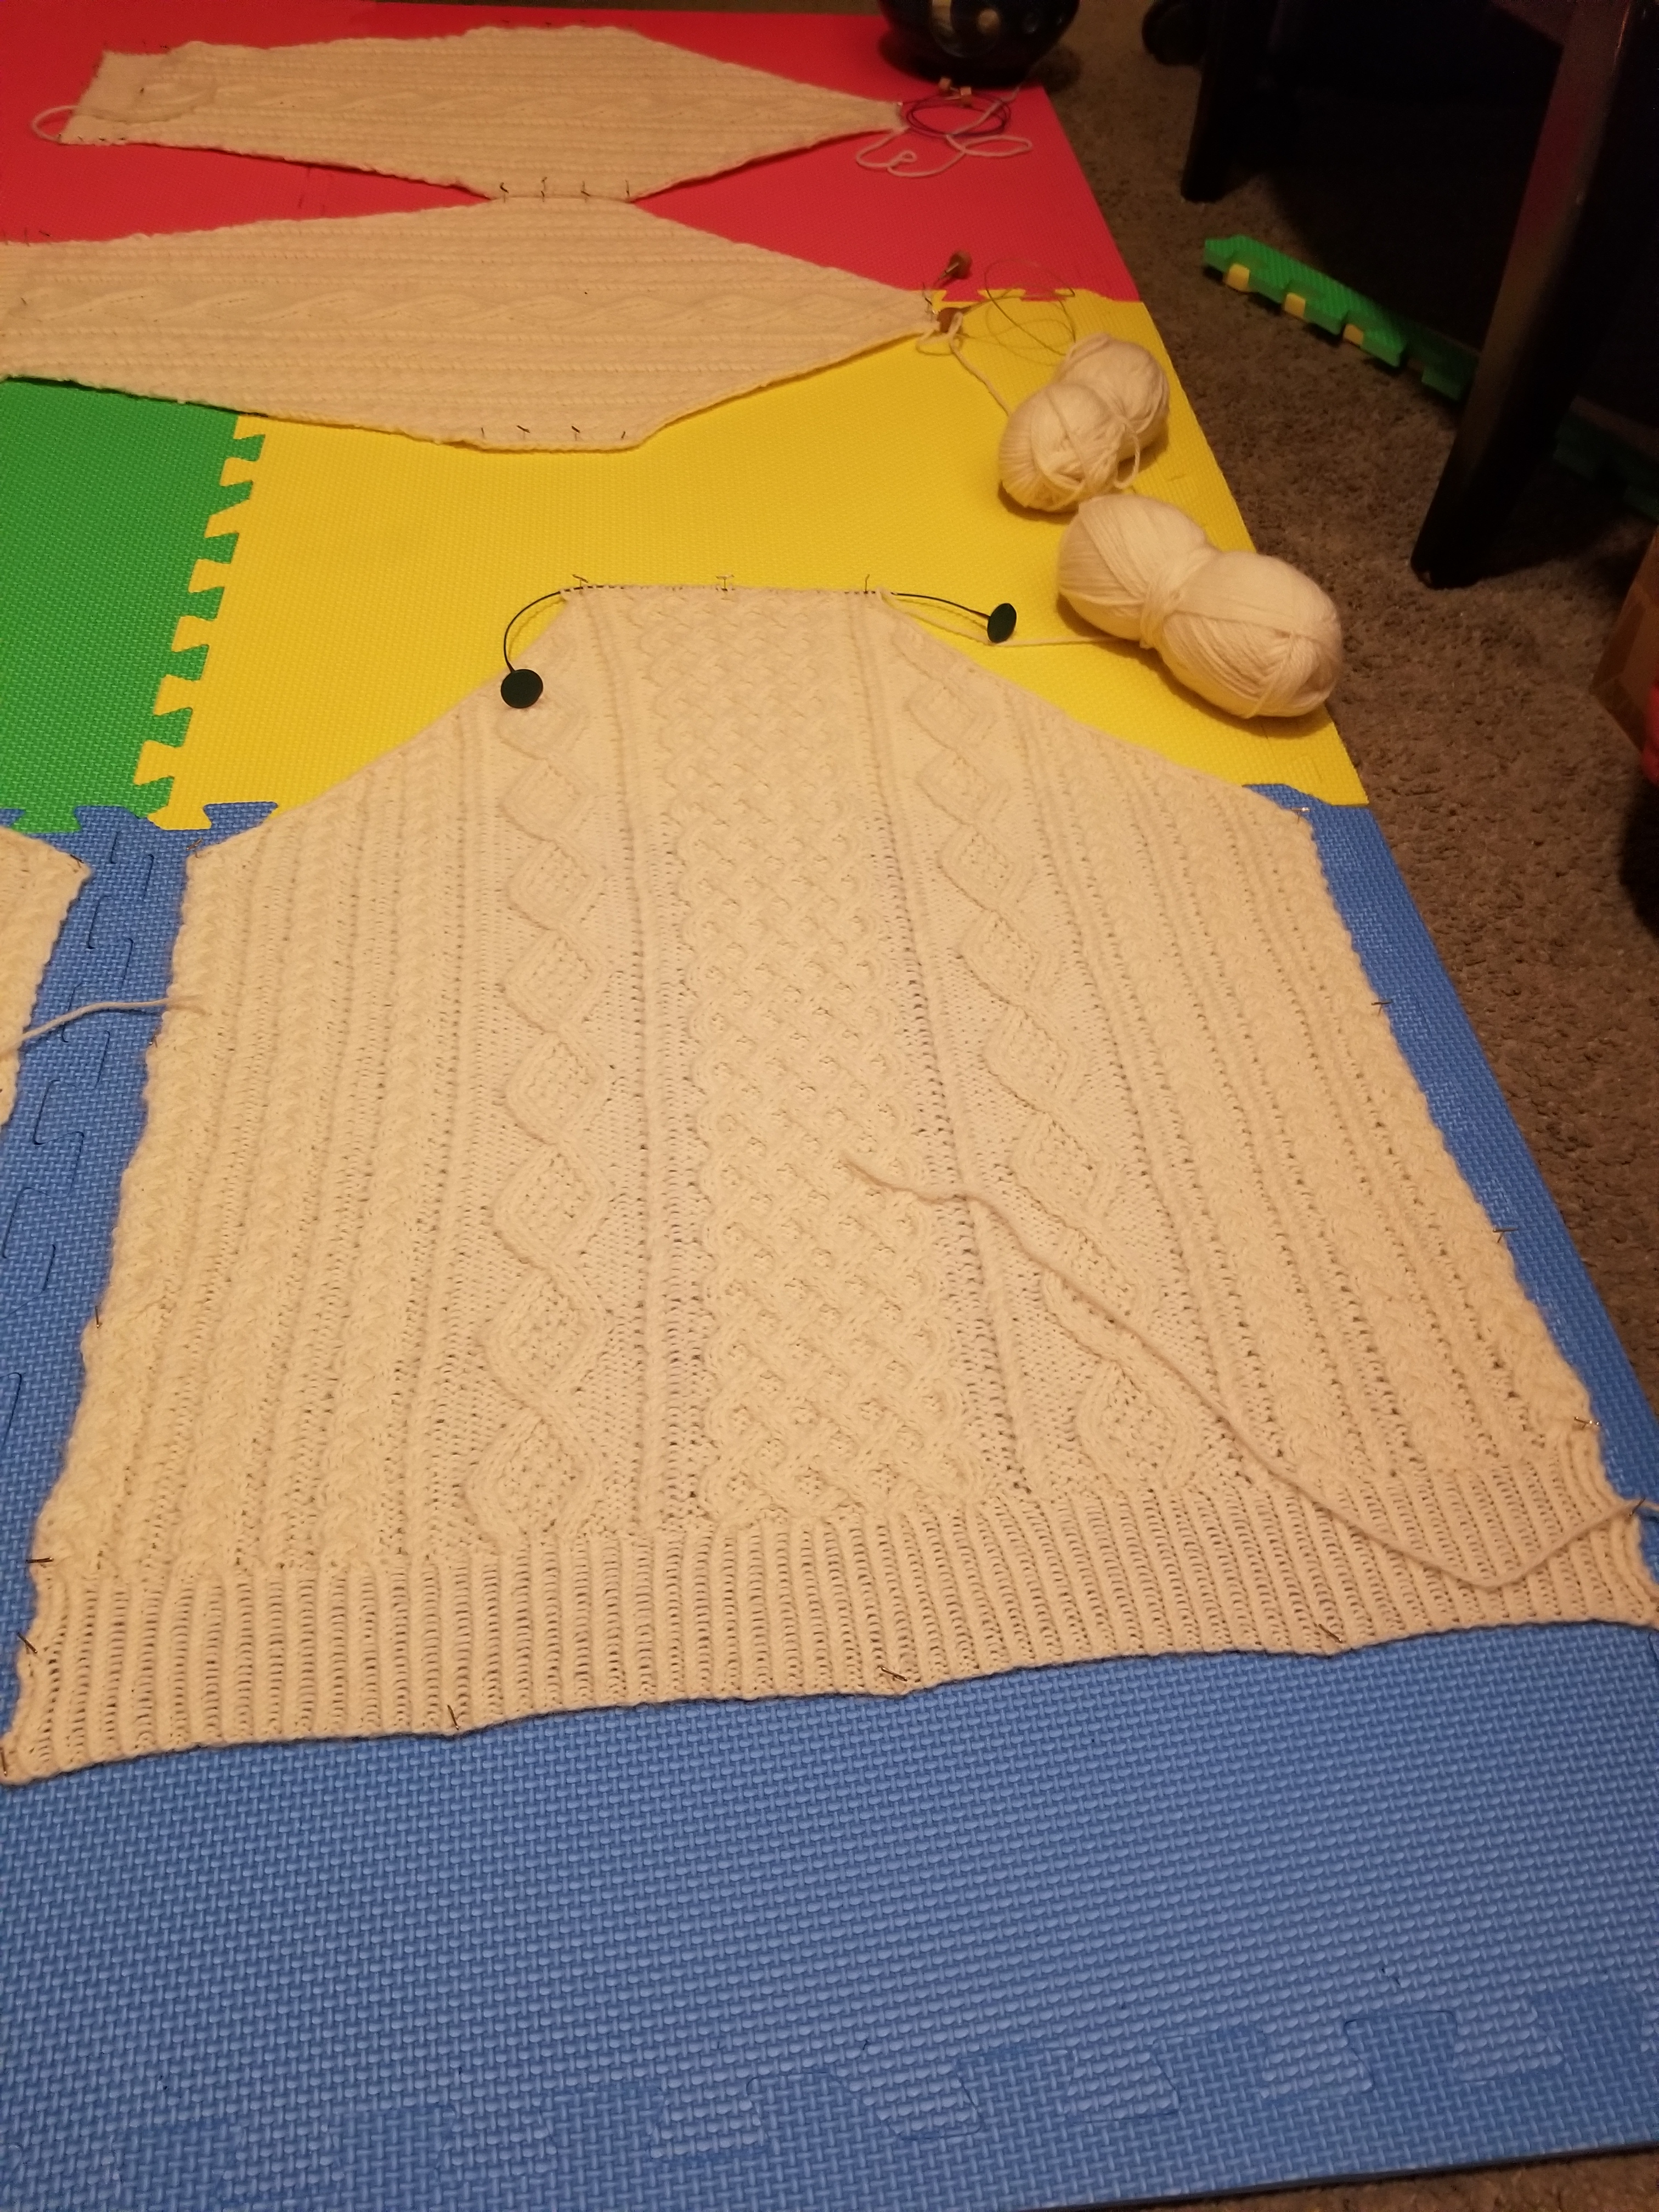
I’ve just completed the seaming for (almost) all of the slanted boundaries where the raglan-style sleeves link up with the main front/back pieces. One seam (the back-left) is left open to be seamed later on.
Here’s what it looks like now:
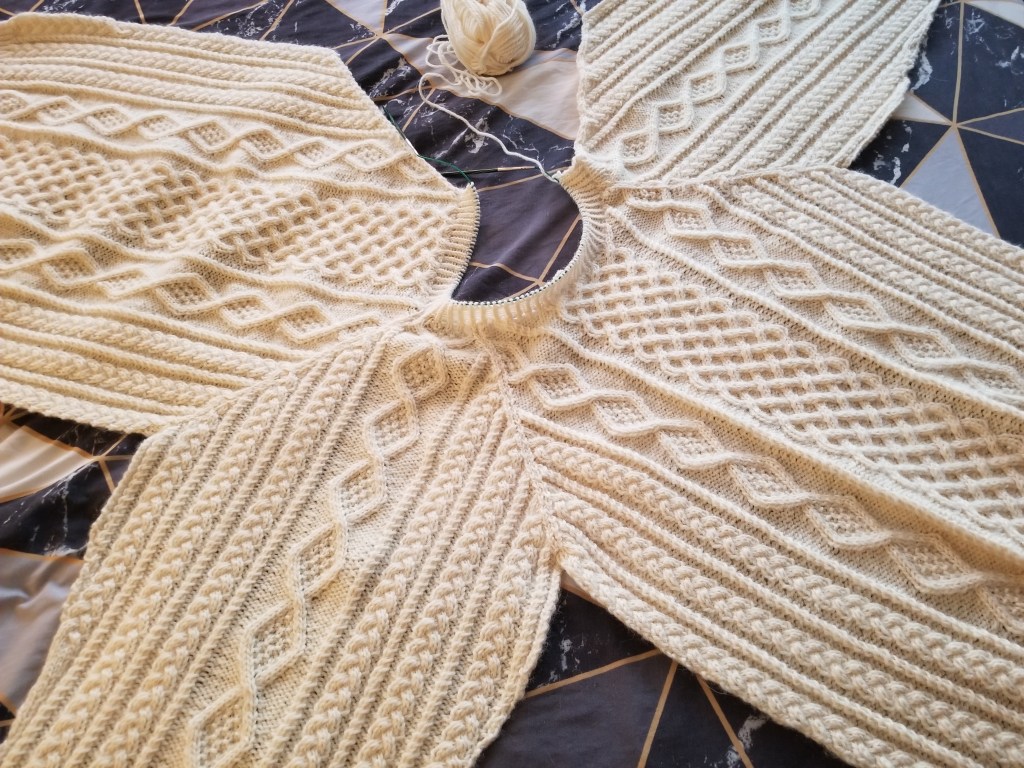
Now things are a bit tidier since all 4 pieces are connected up into a single item.
There are still loose ends everywhere though 🥲 gonna be fun weaving those in at the end.
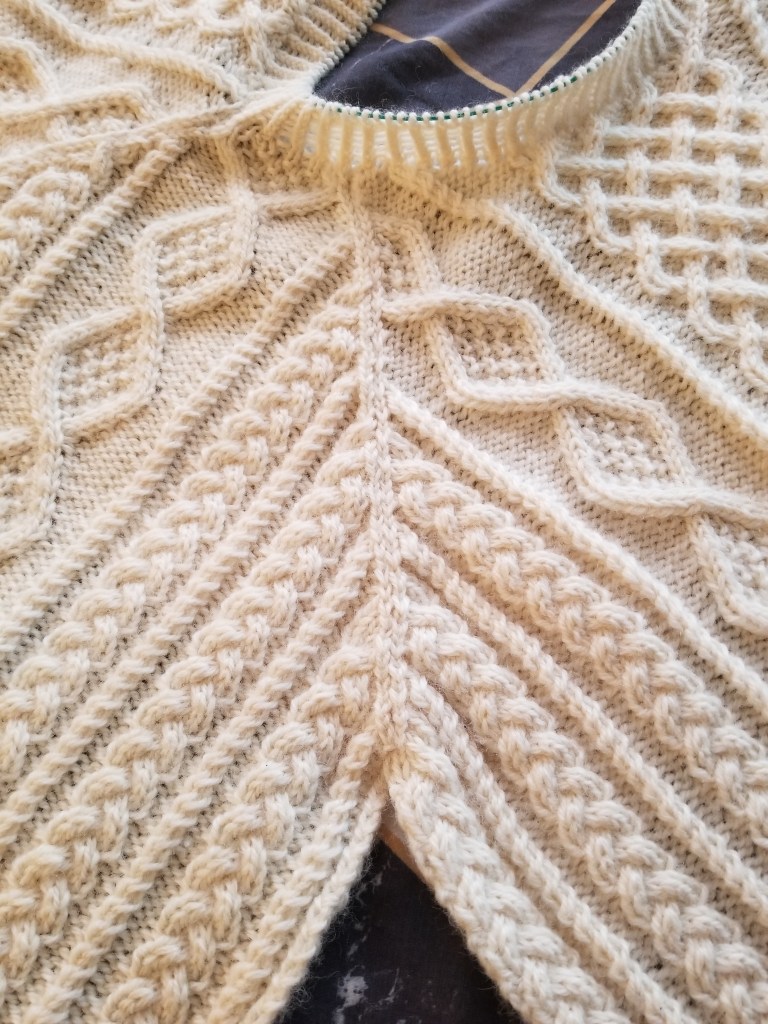
I think my seaming generally comes out okay, but I could definitely work on that in the future.
To be honest, I’m not even sure I do it correctly, but I like the way the slanted boundary came out here so… 🤷♂️
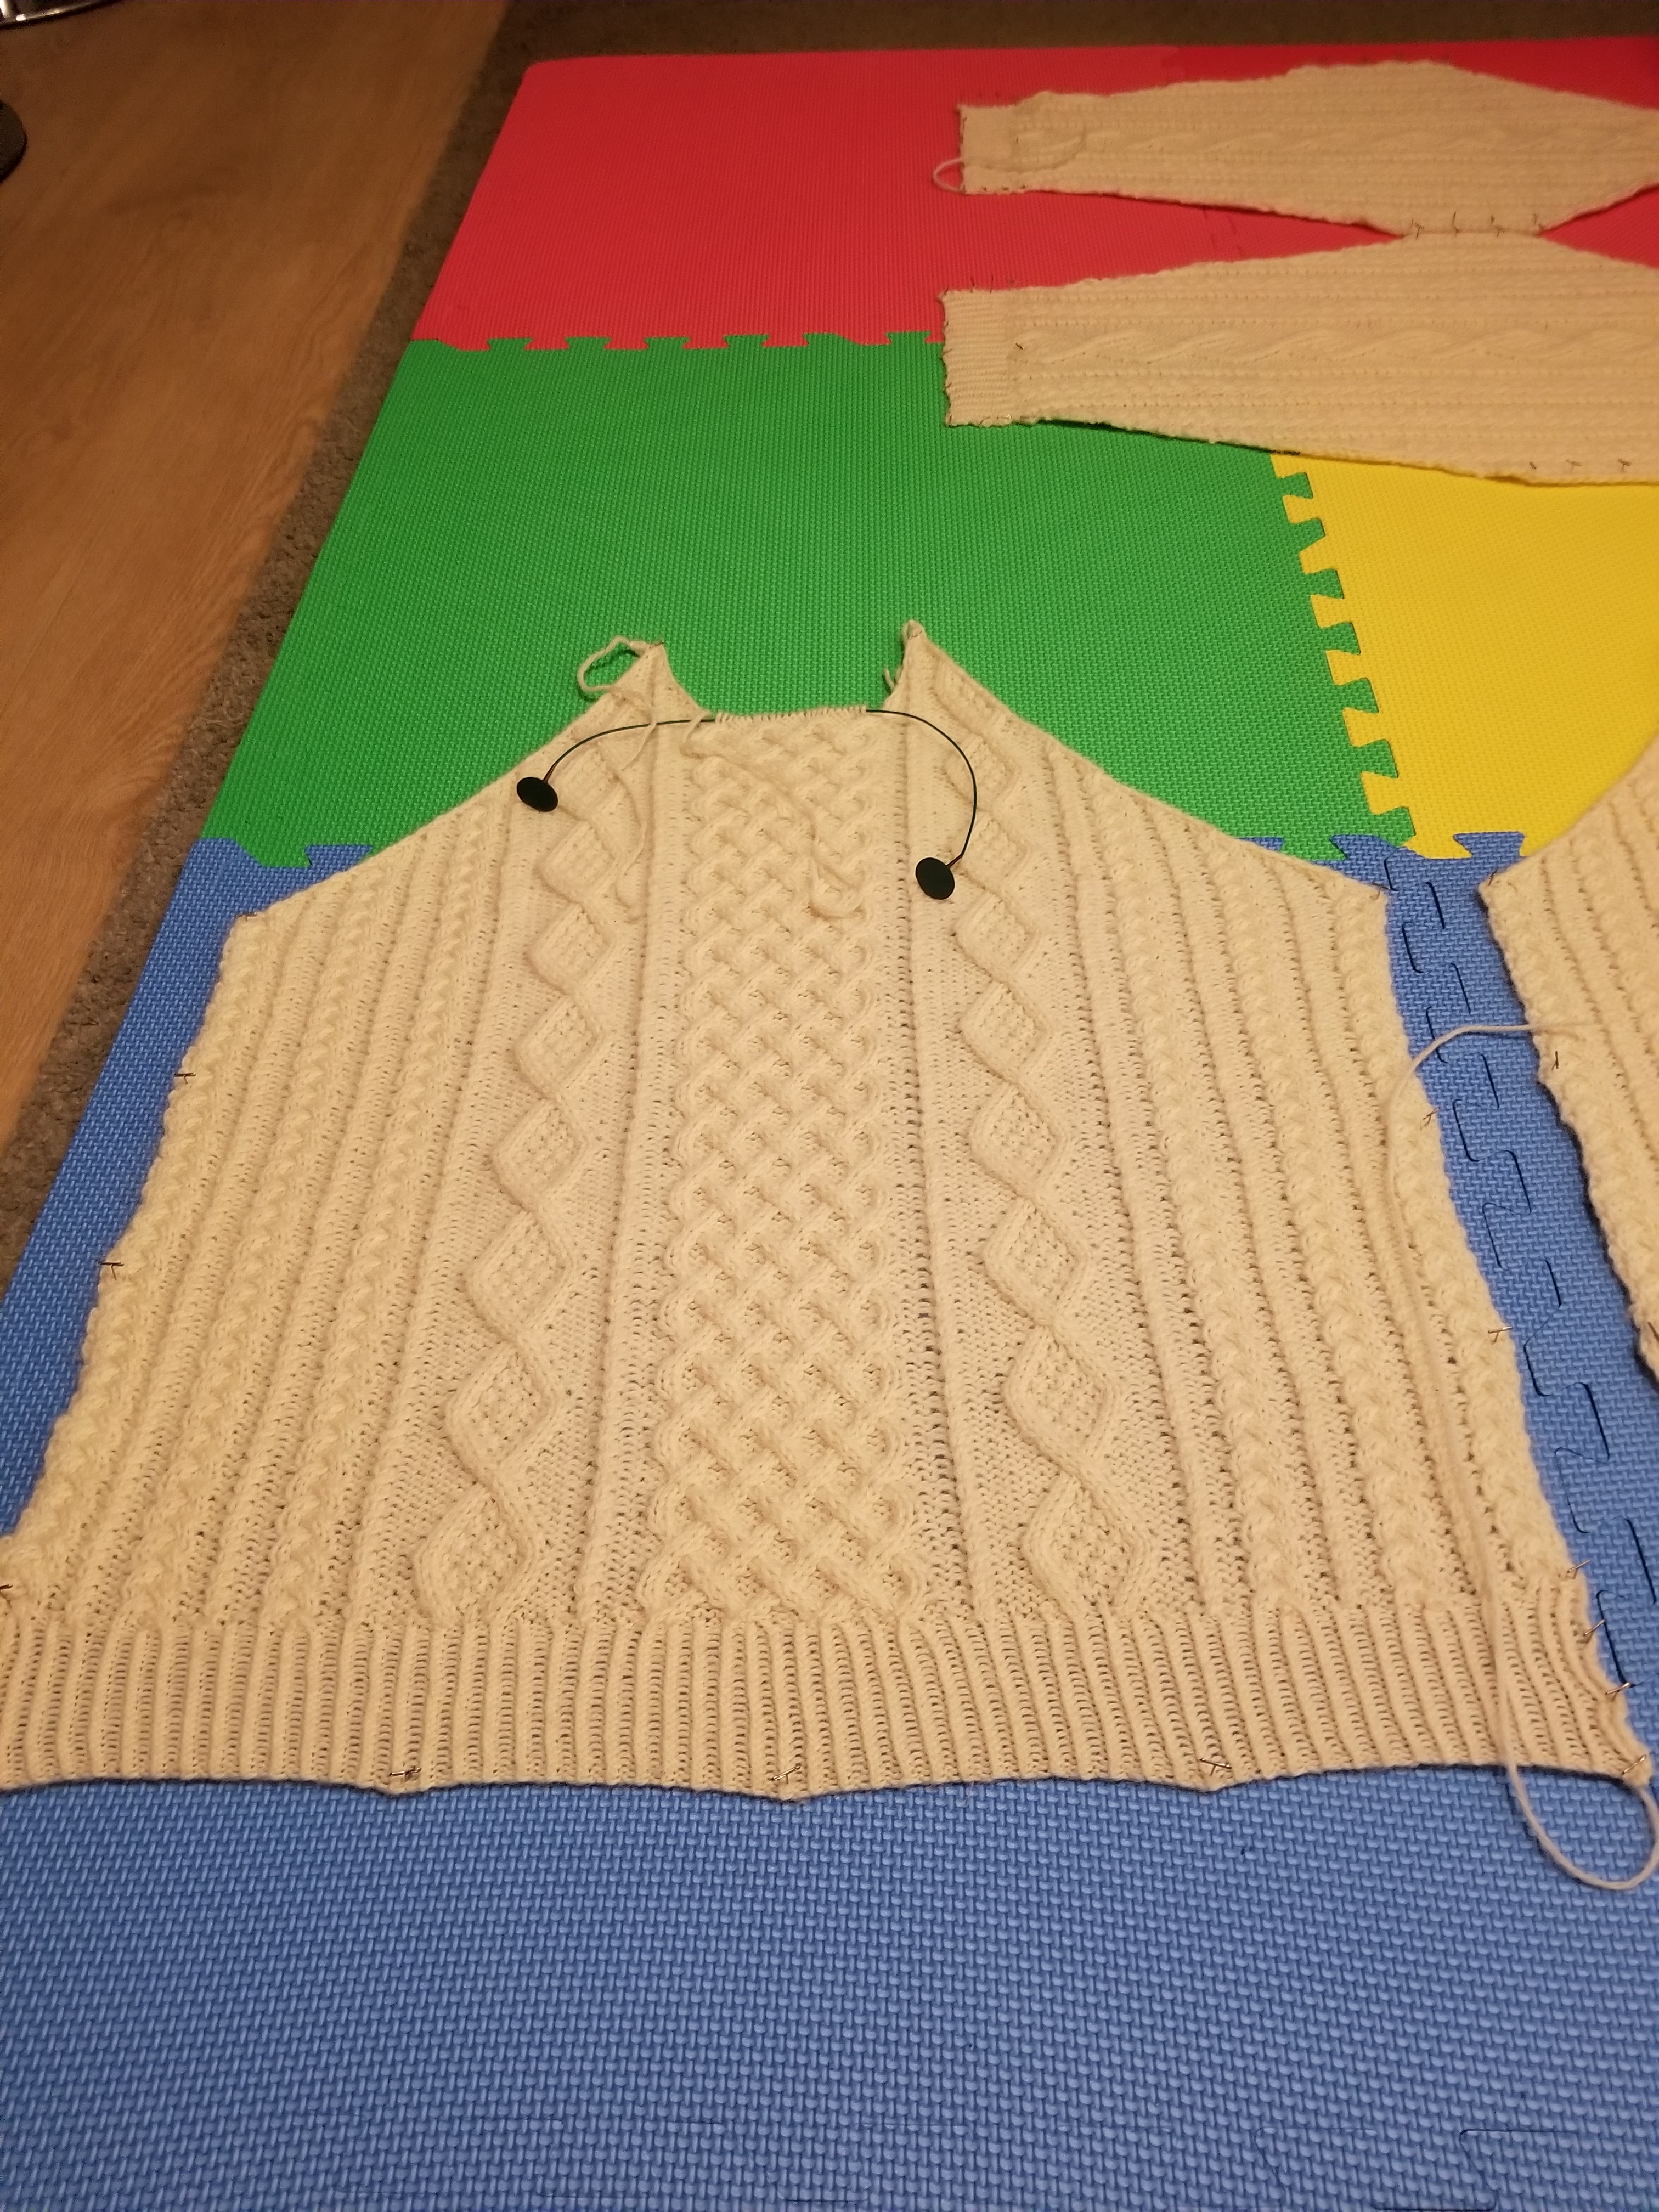
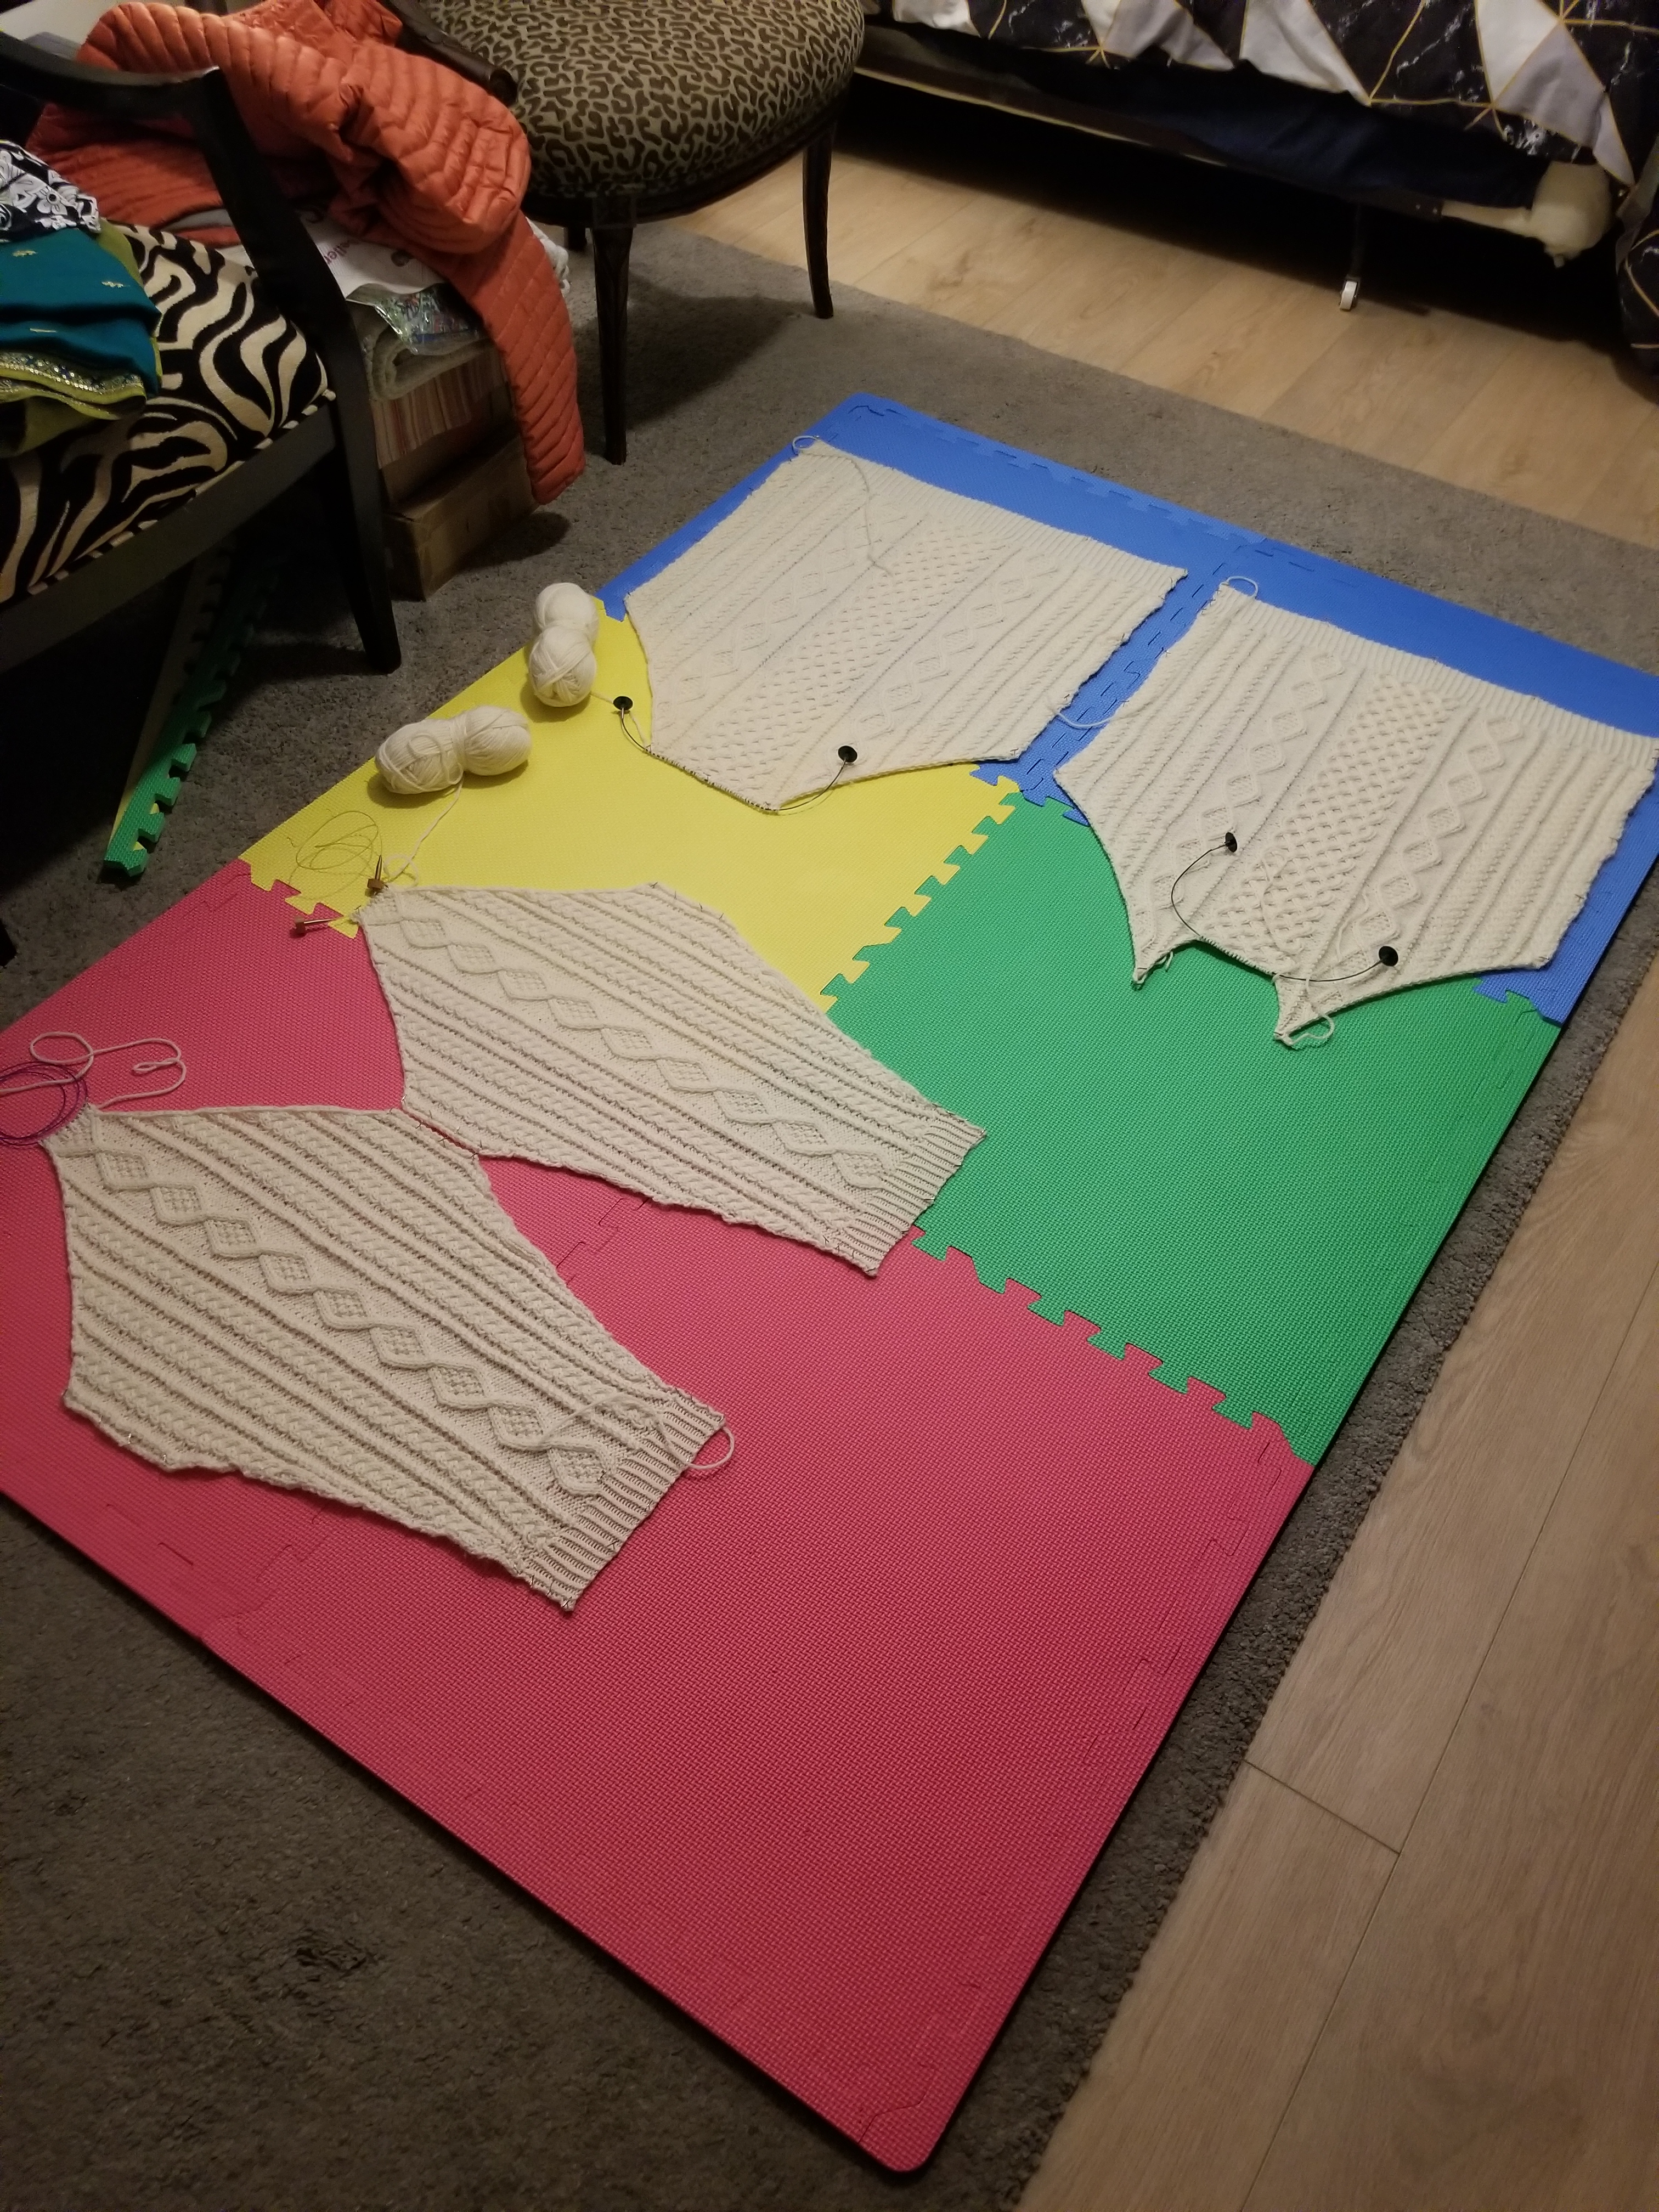
One of the last steps is making the neckband, which needs to be done to all the pieces at once.
That involves picking up the stitches that had been left on stitch holders, as well as picking up new stitches from any closed/cast-off edges.
I started on that and have done a bit of it, so hopefully that part will be done in a few days.
After that little neckband digression, the last part will be to seam everything up and weave in ends.
Then I’ll finally be free from this project and done with the year 😭
It has been a while… but I’ve returned to finish up the Aran sweater I’ve been working on!
I was a bit distracted with the Swan Shawl project that I picked up in the meantime 😅
I finished the 2nd sleeve, so now all of the pieces of the sweater are complete!
I considered washing and blocking the parts to make them fit the measurements, but I was a bit worried that it might end up stretching it out and making the sweater baggy. The pieces already seemed to have the right measurements, so I felt that washing was unnecessary. So I ended up just pinning them to confirm they were the right size and make them fit the measurements neatly.
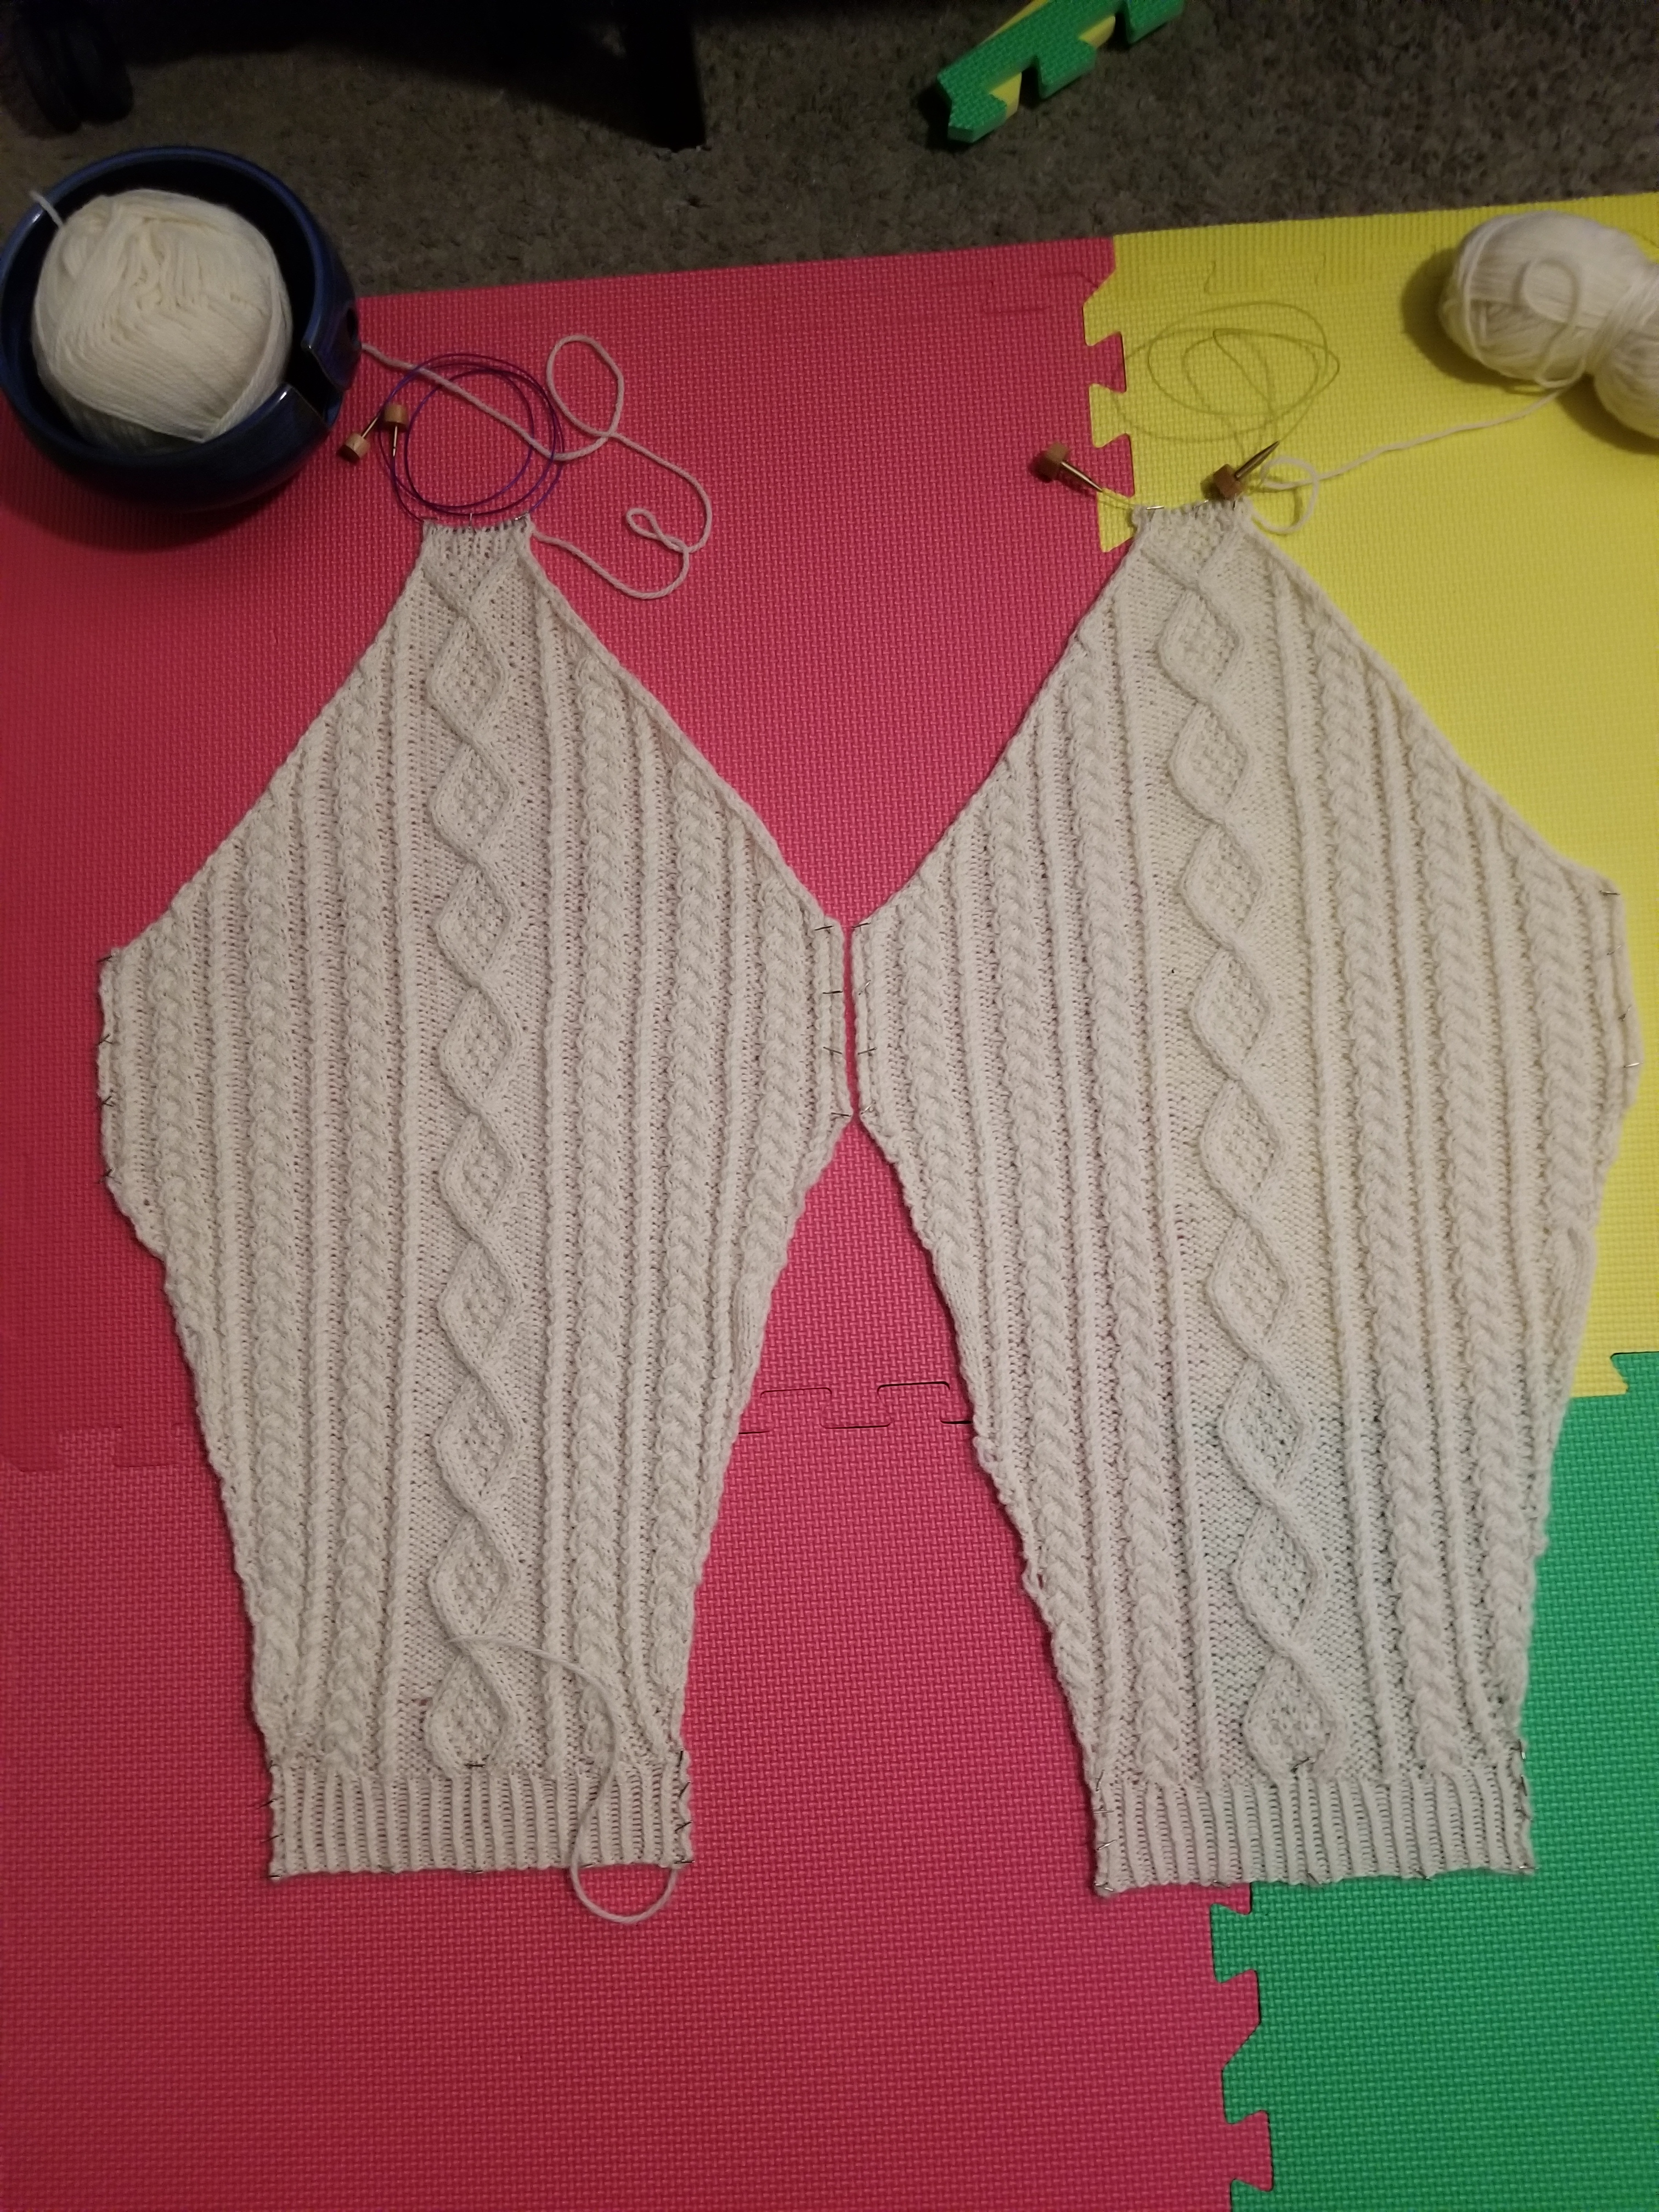
All that’s left to do now is seam all of the pieces together.
That’s definitely my least favorite part of the project 😔 might take me a few attempts.
Oh and I also have to knit the neckband to finish up once everything is connected up.
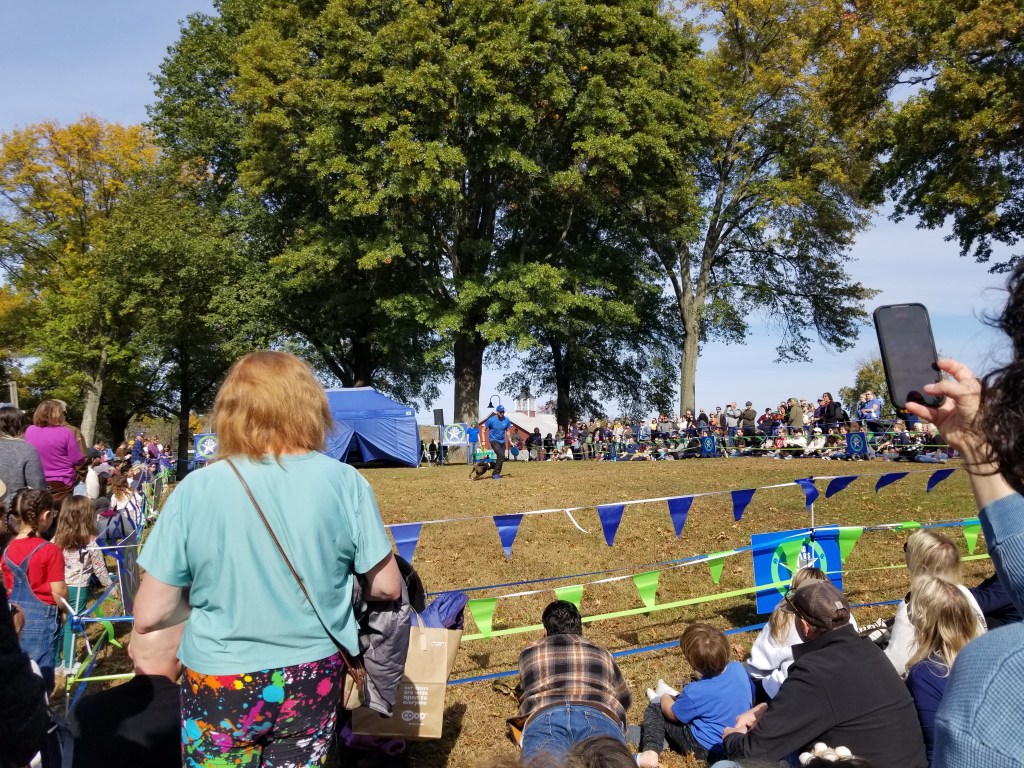
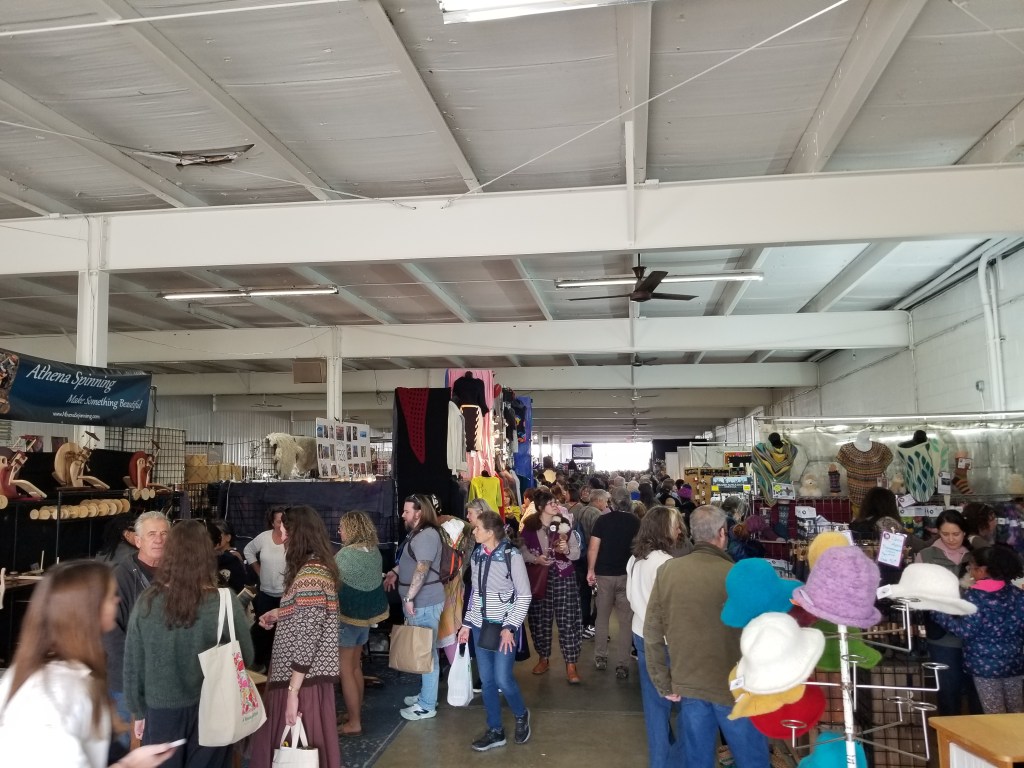
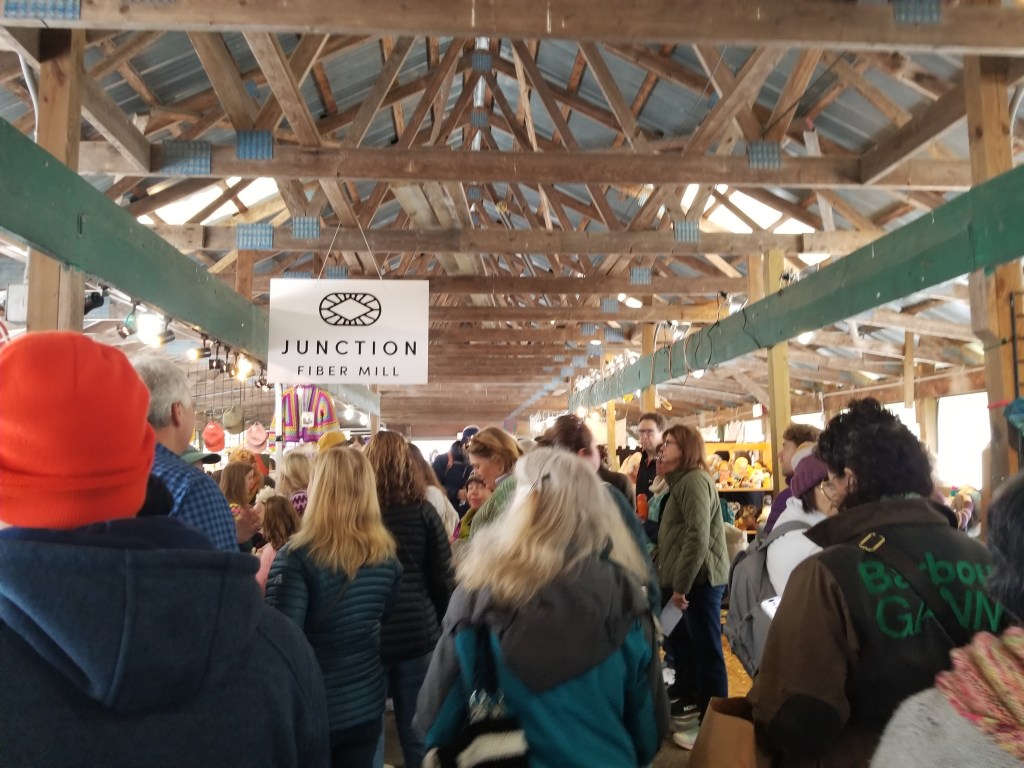
This past weekend, I attended the New York Sheep and Wool Festival (also called Rhinebeck, after the town in which it takes place). It was the first time that I had attended Rhinebeck or any yarn/crafting festival, and it was a really fun experience! I wanted to dedicate a post to talking about my experience with it this year.

The festival officially takes place over two days: Saturday and Sunday. There are also events that happen on the preceding Thursday and Friday, but those are considered unofficial.
For this visit, I was only planning on attending for one day. Even though I very much enjoy knitting, I wasn’t certain I’d want to spend two full days walking around and shopping 😋, so I planned to only go on Saturday.
I also went with the local knitting group I started, now named the Jersey City Stitch Society, and we arranged to rent a mini-van and drive a group of us there and back. Originally I was planning to drive with some other group members, but the mini-van was a good choice since it was able to fit everyone who was planning to go together into one car.
The festival goes from 9 am to 4 pm, and we knew there would be traffic at the end of the day, so the plan was to show up early and leave early to avoid the traffic exiting the fairgrounds. I had also signed up for a workshop which went from 10 am to 1 pm.
This ended up being my timeline for that Saturday:
The event wasn’t prohibitively busy, but there were still more people than I expected 😅
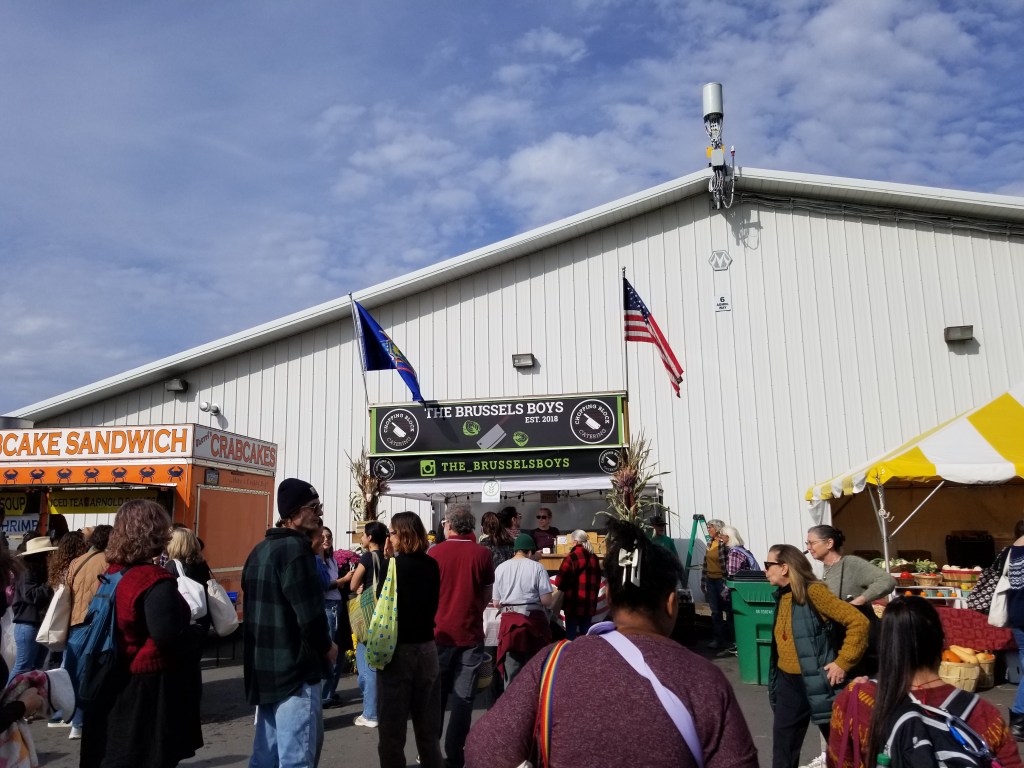

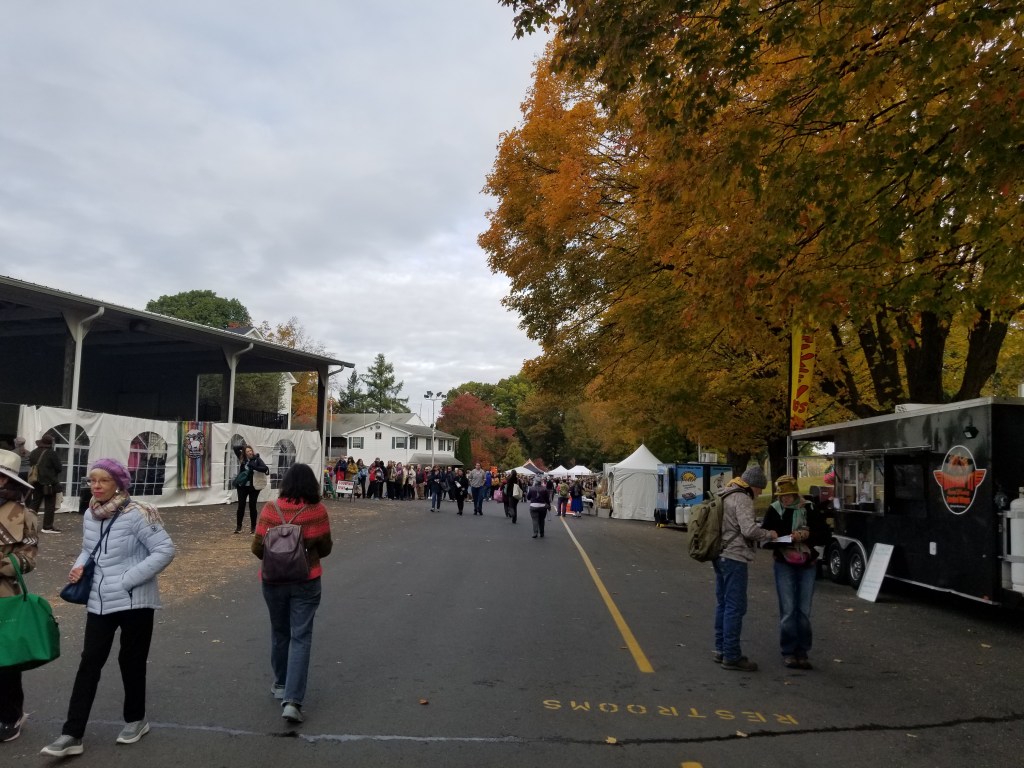
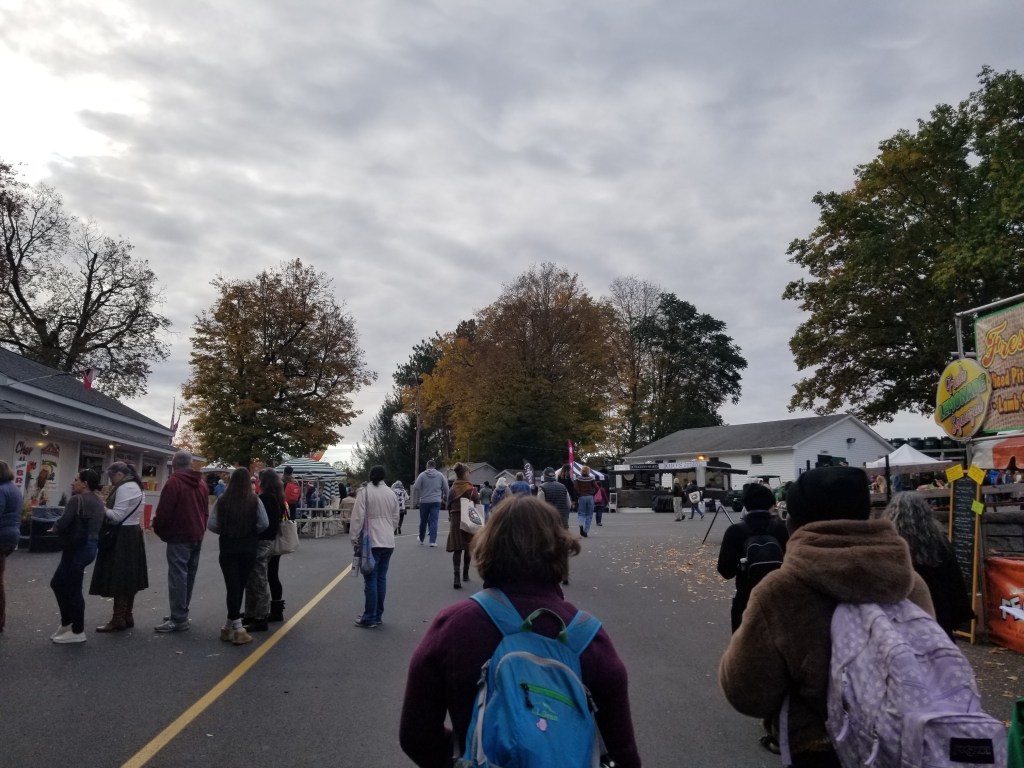
Let’s break down the day’s happenings 😊
The workshop I attended was called “Estonian Decorative Stitches”, taught by Heather Storta.
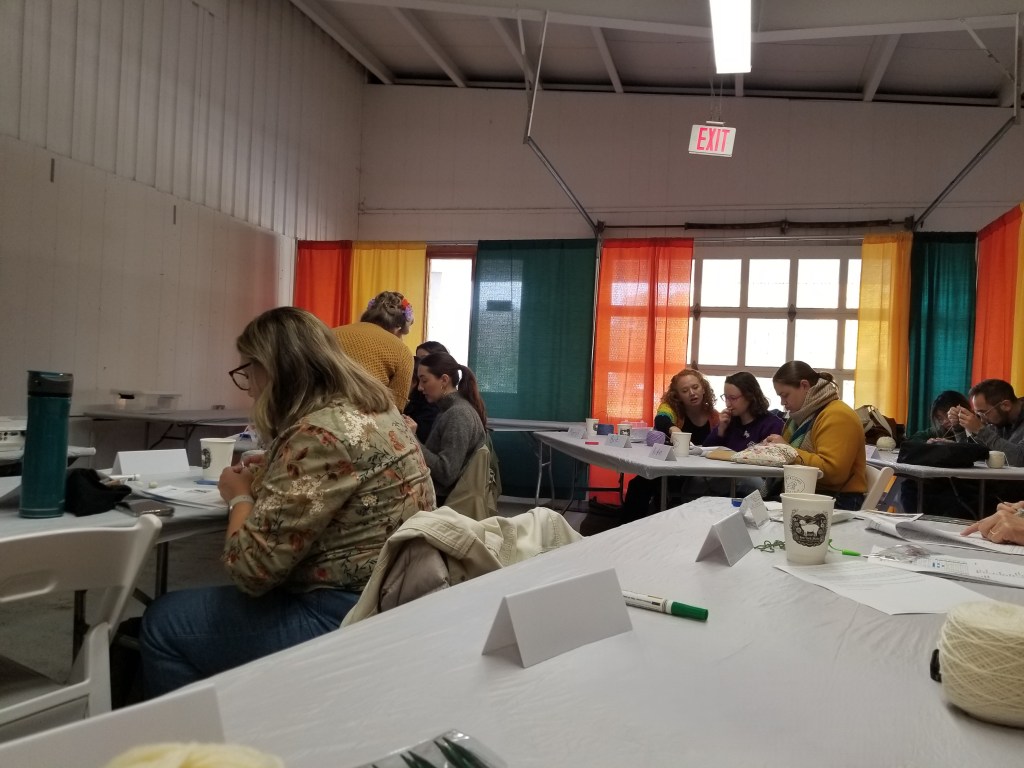
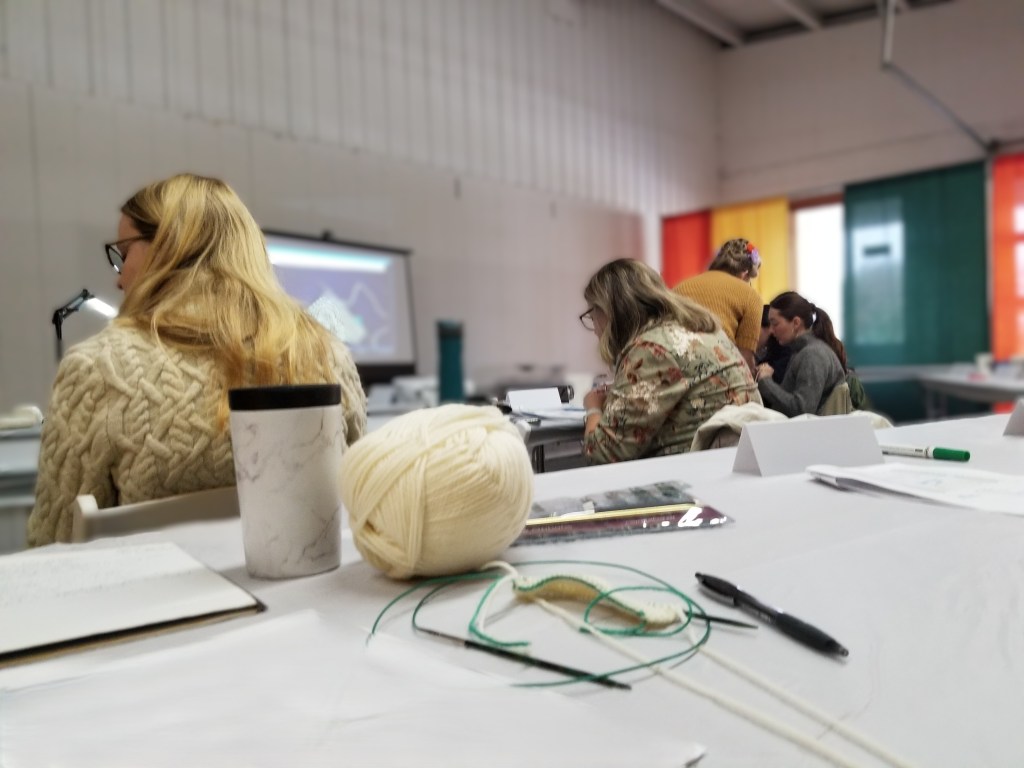
Initially I was worried about whether I was stepping into something too advanced for me 😅 However, it turned out completely fine! The workshop was very informative and catered to many skill levels. I won’t give any specific details about what was taught, so you’ll have to attend one of Heather’s workshops if you want to learn 😏
Heather also ran it very well! She came prepared with an overhead camera so she could project her work as she did it, and have people copy her in real-time. I asked a bunch of questions too, since I get hung up on particulars.
After the class, I was also able to ask Heather about TKGA certification and chart design software. I may look into getting TKGA certified in the near future 🤔 … we’ll see about that though.
I know other people tend to splurge and buy a bunch of yarn at events like this, but that’s just not me 🤷 I’ve never really understood the idea of buying an arbitrary amount of yarn on a whim when you don’t having a particular pattern or project in mind for that yarn. Since I didn’t have any projects in mind, I luckily didn’t end up buying a ton of yarn, or any yarn at all.
Here’s what I did get:

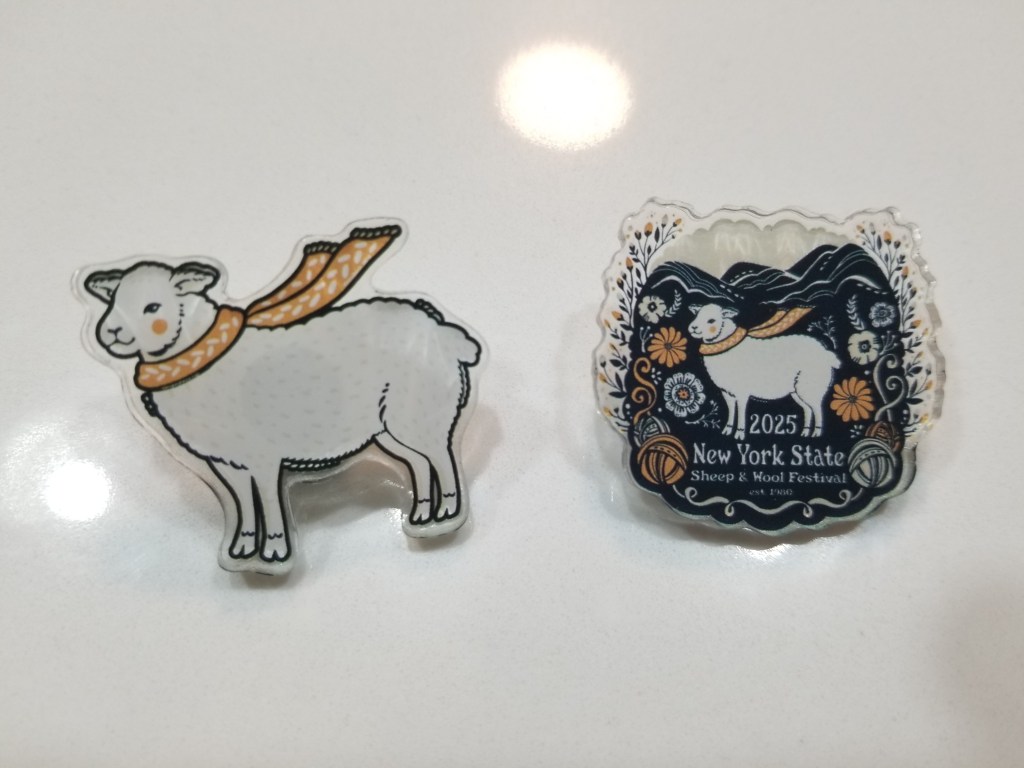
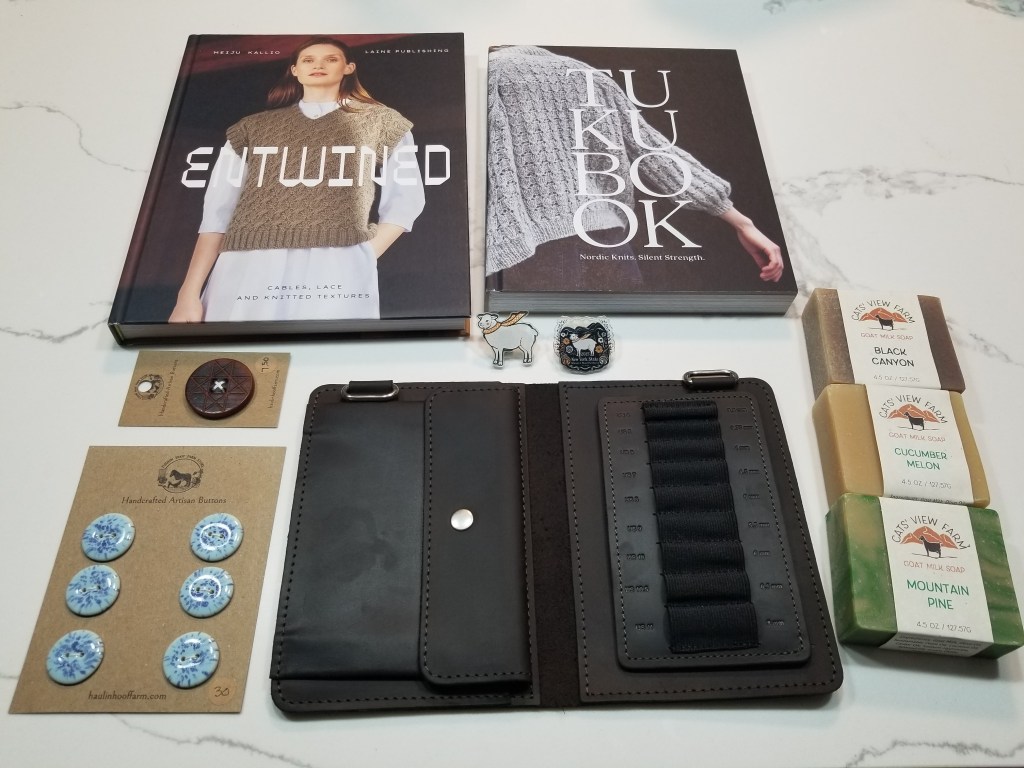
Please note that I am not sponsored by anyone! (But sponsors are welcome to contact me 👍)
This was the main thing that I figured I’d want to buy at the festival. Conveniently, there was a main section where most of the books and authors were all in one place.
I was also really curious if I’d be able to meet the actual authors of the books there, and I did!
They autographed the books I got 😊
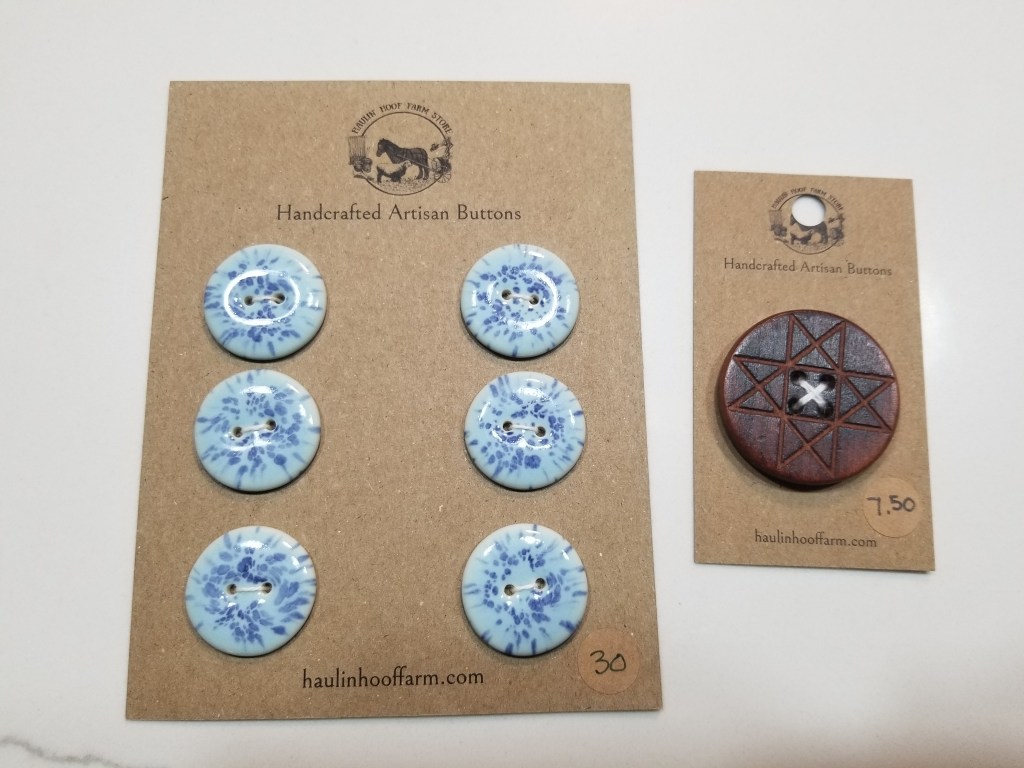
This item was one I was really not looking out for at first. But once I passed by their stand and saw the nice cases, I kinda just had to get one 😭. I will probably do a review of this product once I’ve used it for a good enough amount of time. The company that makes them is called Thread & Maple.
I was very impressed with the sellers. They are really organized in terms of their product offerings, which made it a lot easier for me to finally decide to buy from them. I’ve had an interchangeable circular needle set from KnitPicks for a while and just kept it in the plastic sleeve that I had bought it in. When I met the Thread & Maple vendors, however, they asked exactly which set I had (manufacturer and specific product set) and were able to give me a case that would hold exactly that set of needles.
I moved my needles over to the case, and so far, it looks and feels great:
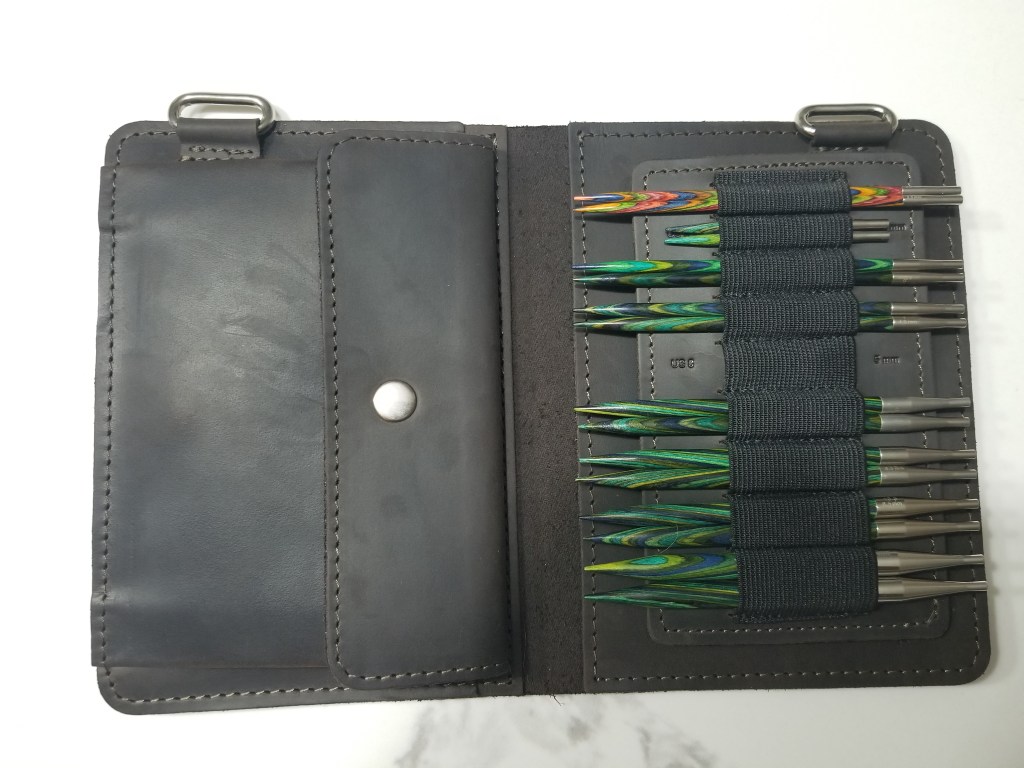
We’ll have to see how well it holds up over time…
I have high hopes for it to last me forever, though 🤞
One of my regrets for this trip was that I did not get enough time to browse the shows, specifically the animals.
If I had had more time, I definitely would’ve gone to see more of the animal displays.
Here’s some of what I did see:
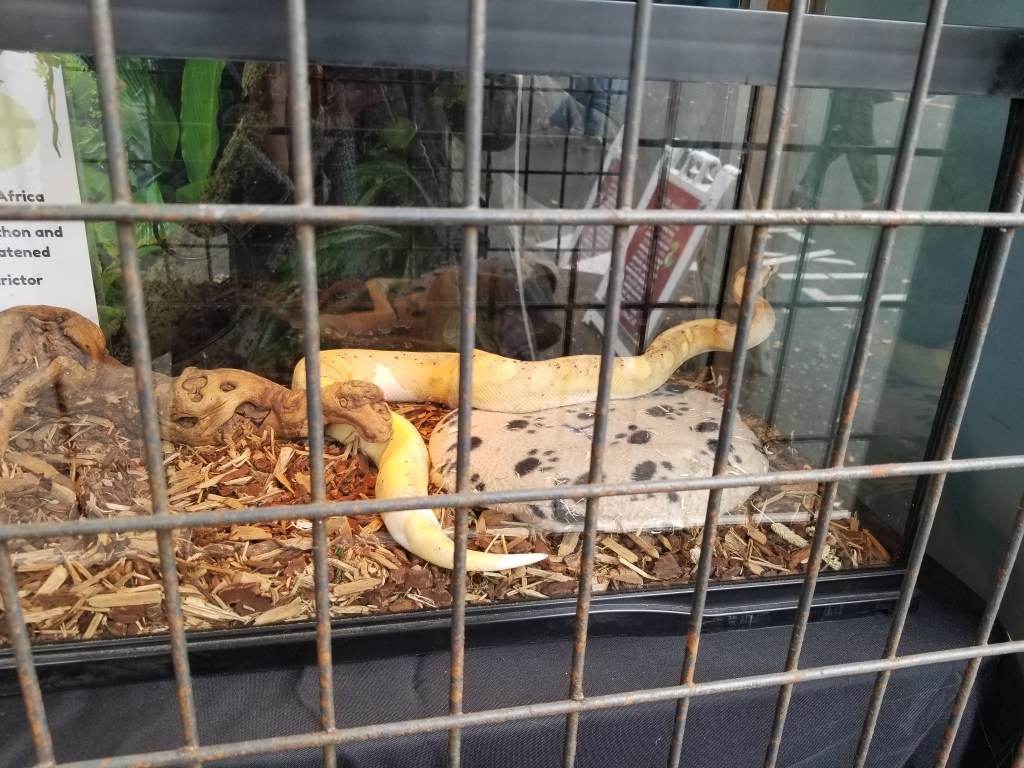

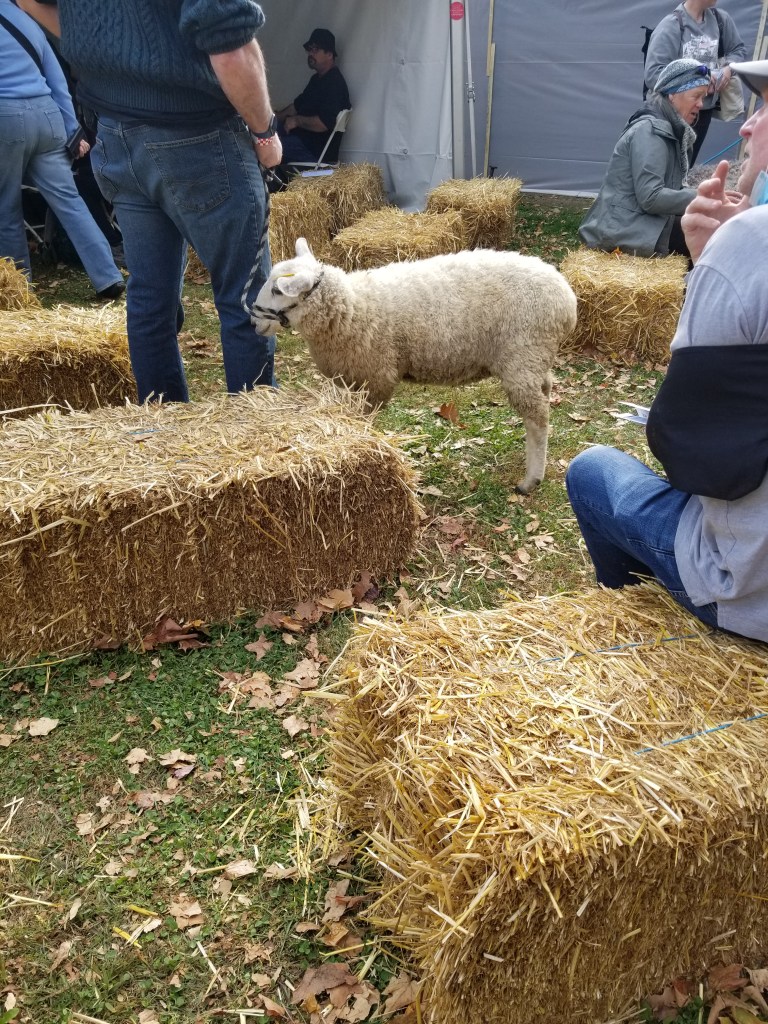
There were various sheep and goat events throughout the day, but the workshop took up most of my time 😔
Maybe one day I’ll come back with a family and spend the day petting sheep instead!
It was absolutely a great idea to make myself come out to the event for the first time and participate in the wider yarn world. I might even look into other similar festivals around the country!
Workshops *definitely* seem like the type of thing I’d want to continue attending at these.
For future festivals, I may plan to stick around for more time to shop and see the shows.
This time, at least, I got a taste of the event’s offerings and will be able to plan better in the future.
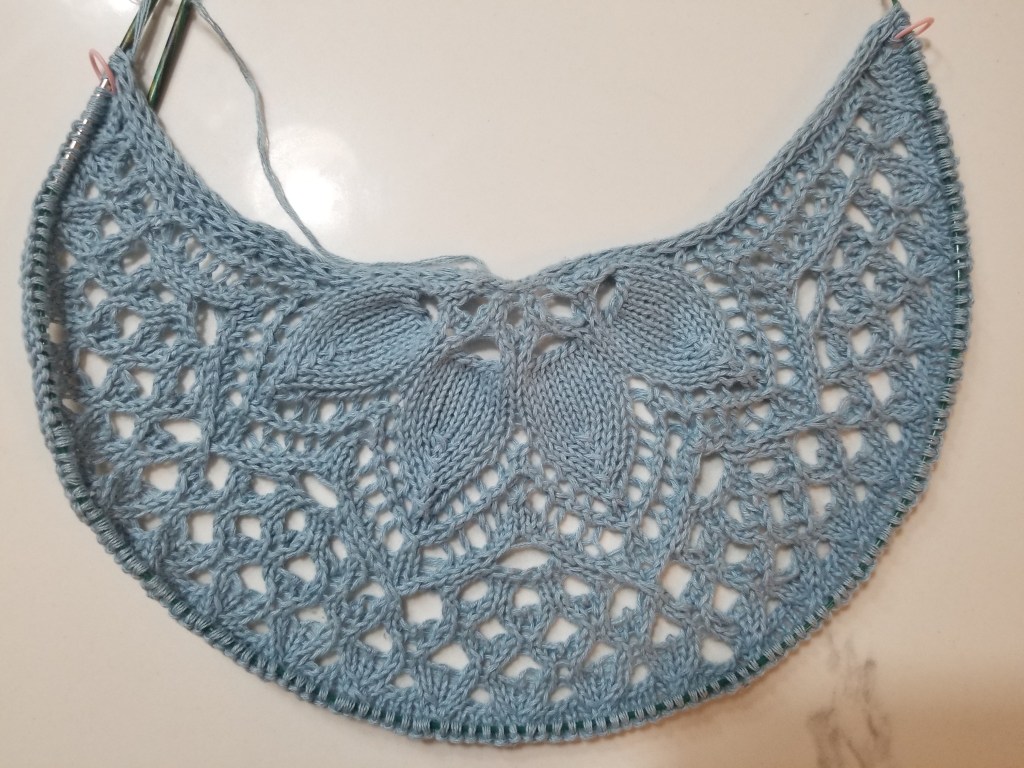
Here’s one last retrospective post on the 🦢 Wild Swan Shawl 🦢 pattern I just completed!
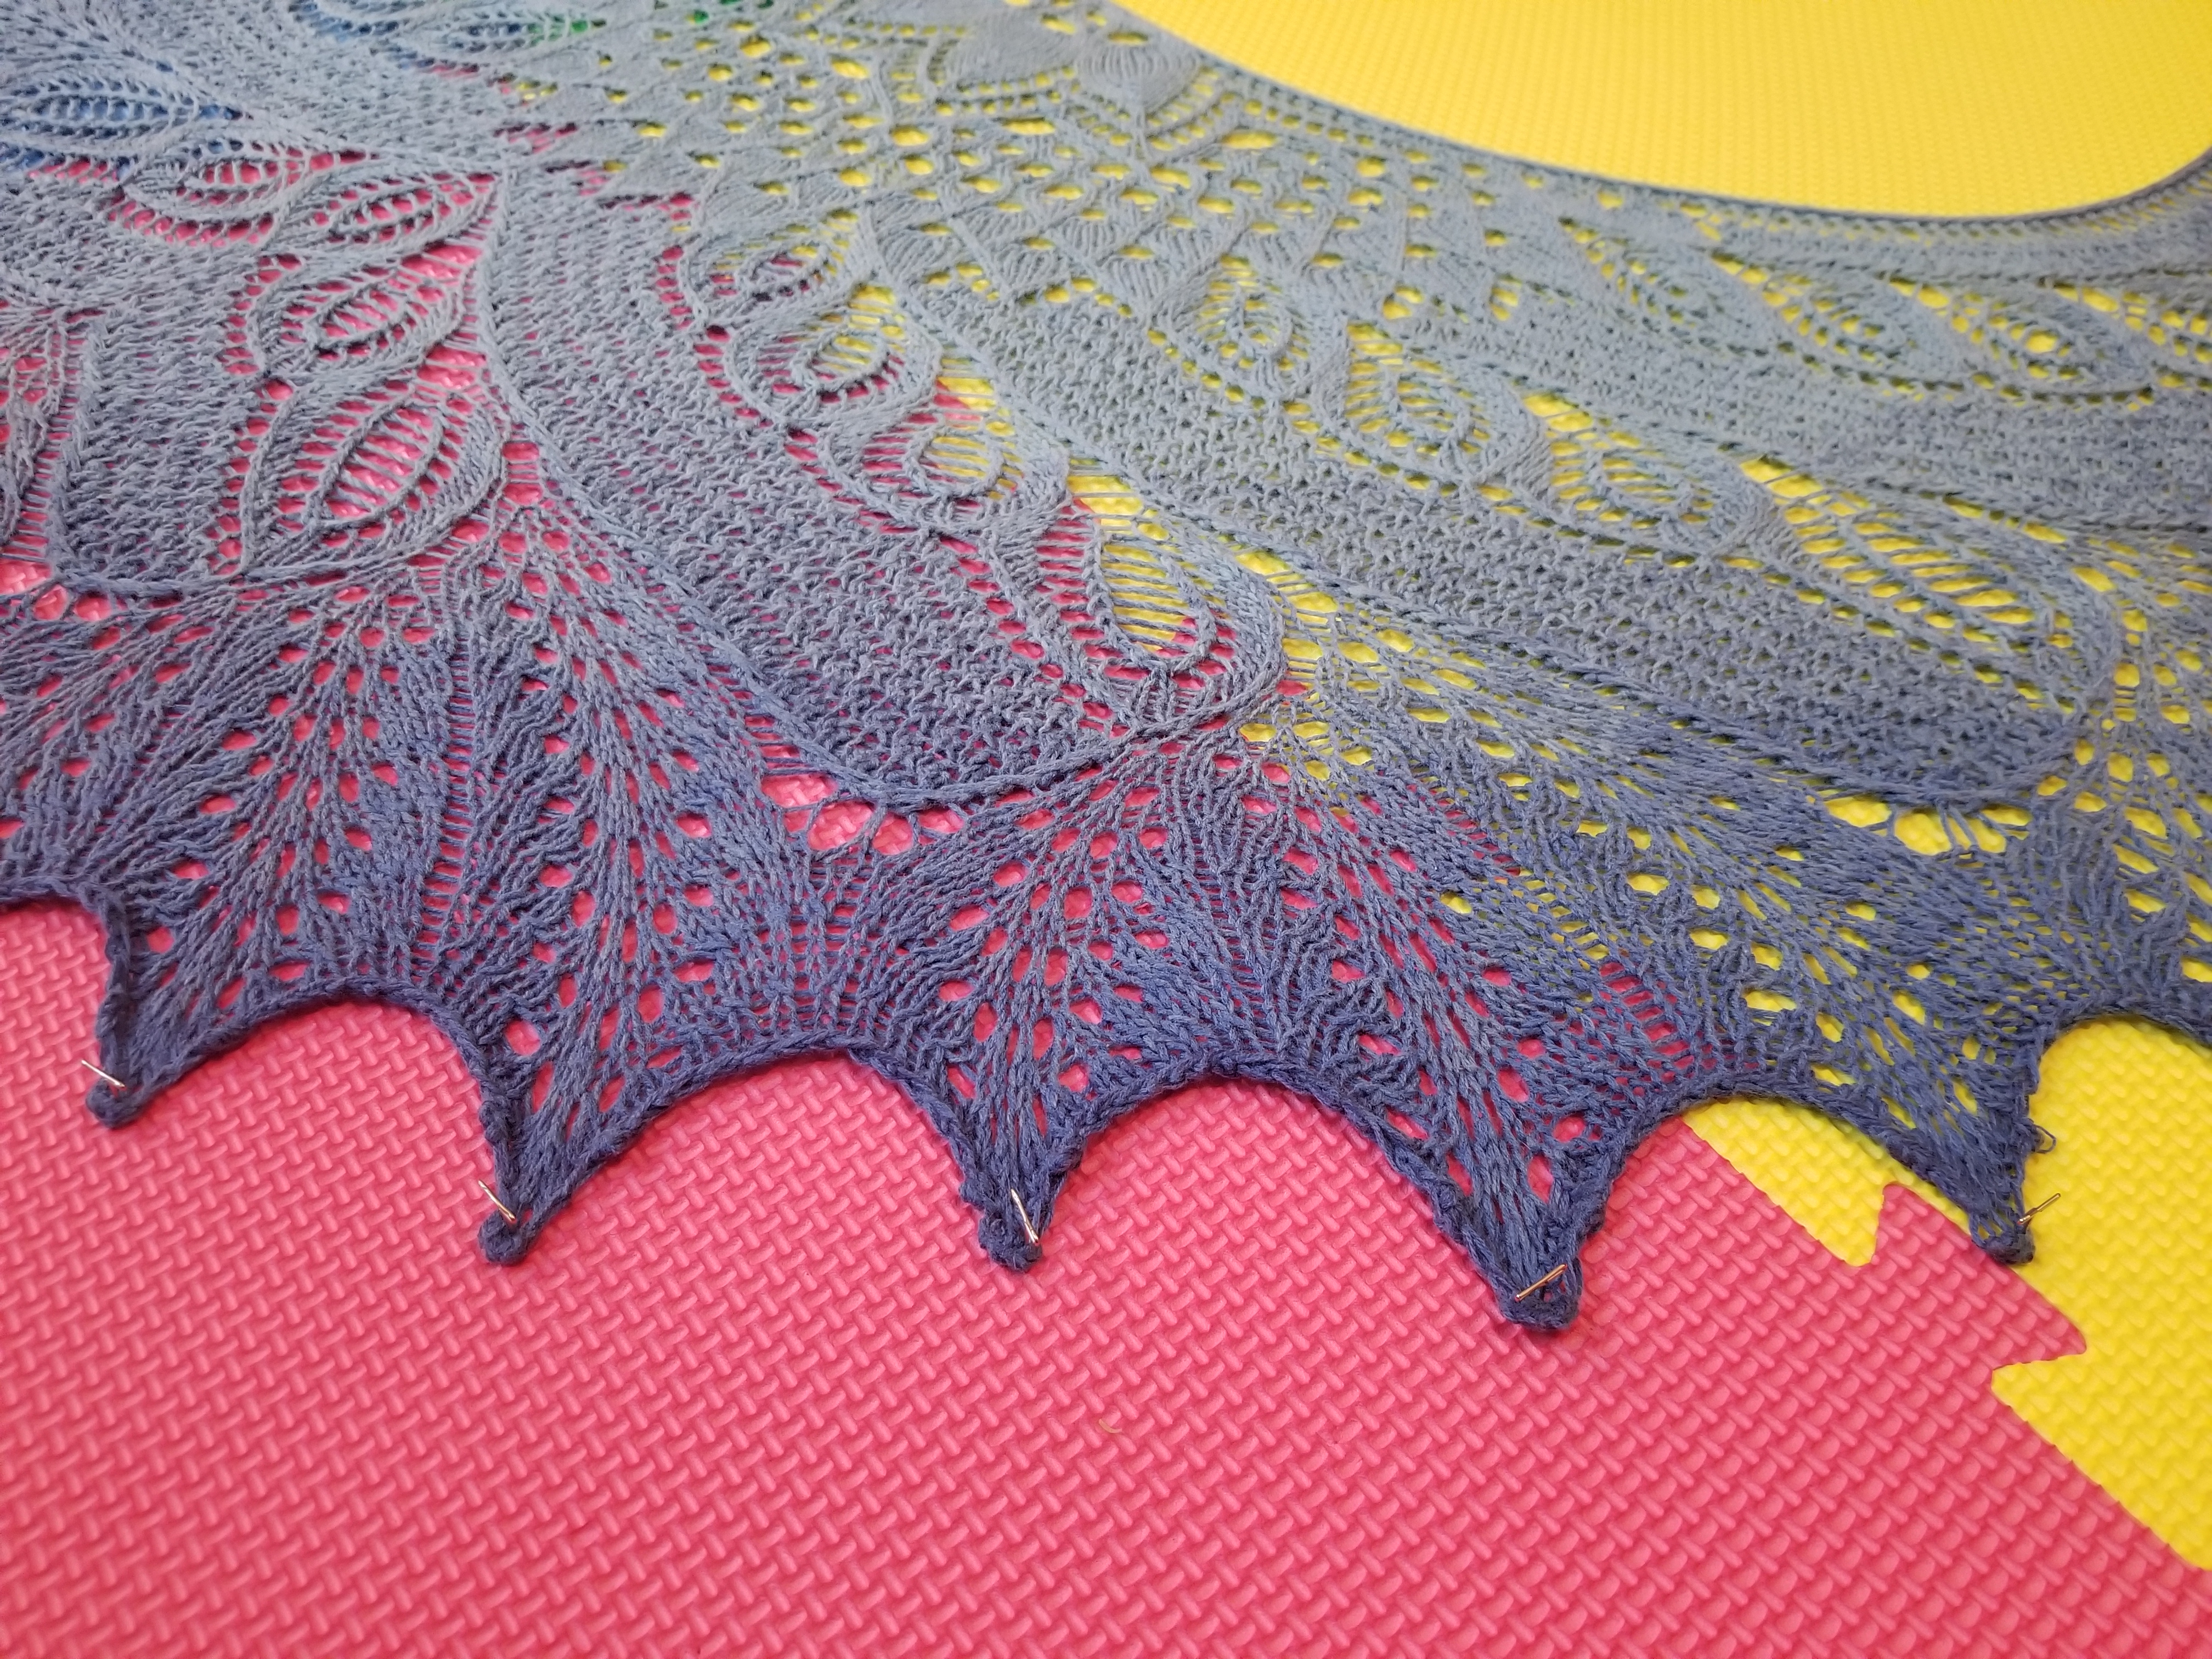
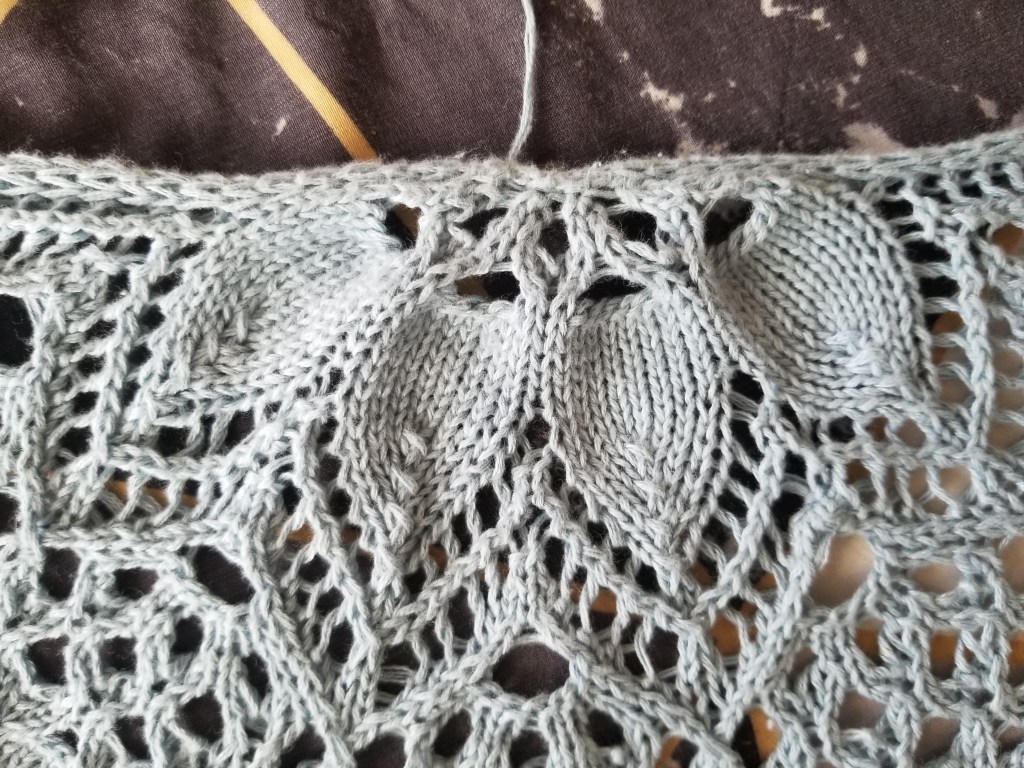
One of the major visual motifs in the pattern is the reoccurring “feather” seen here:
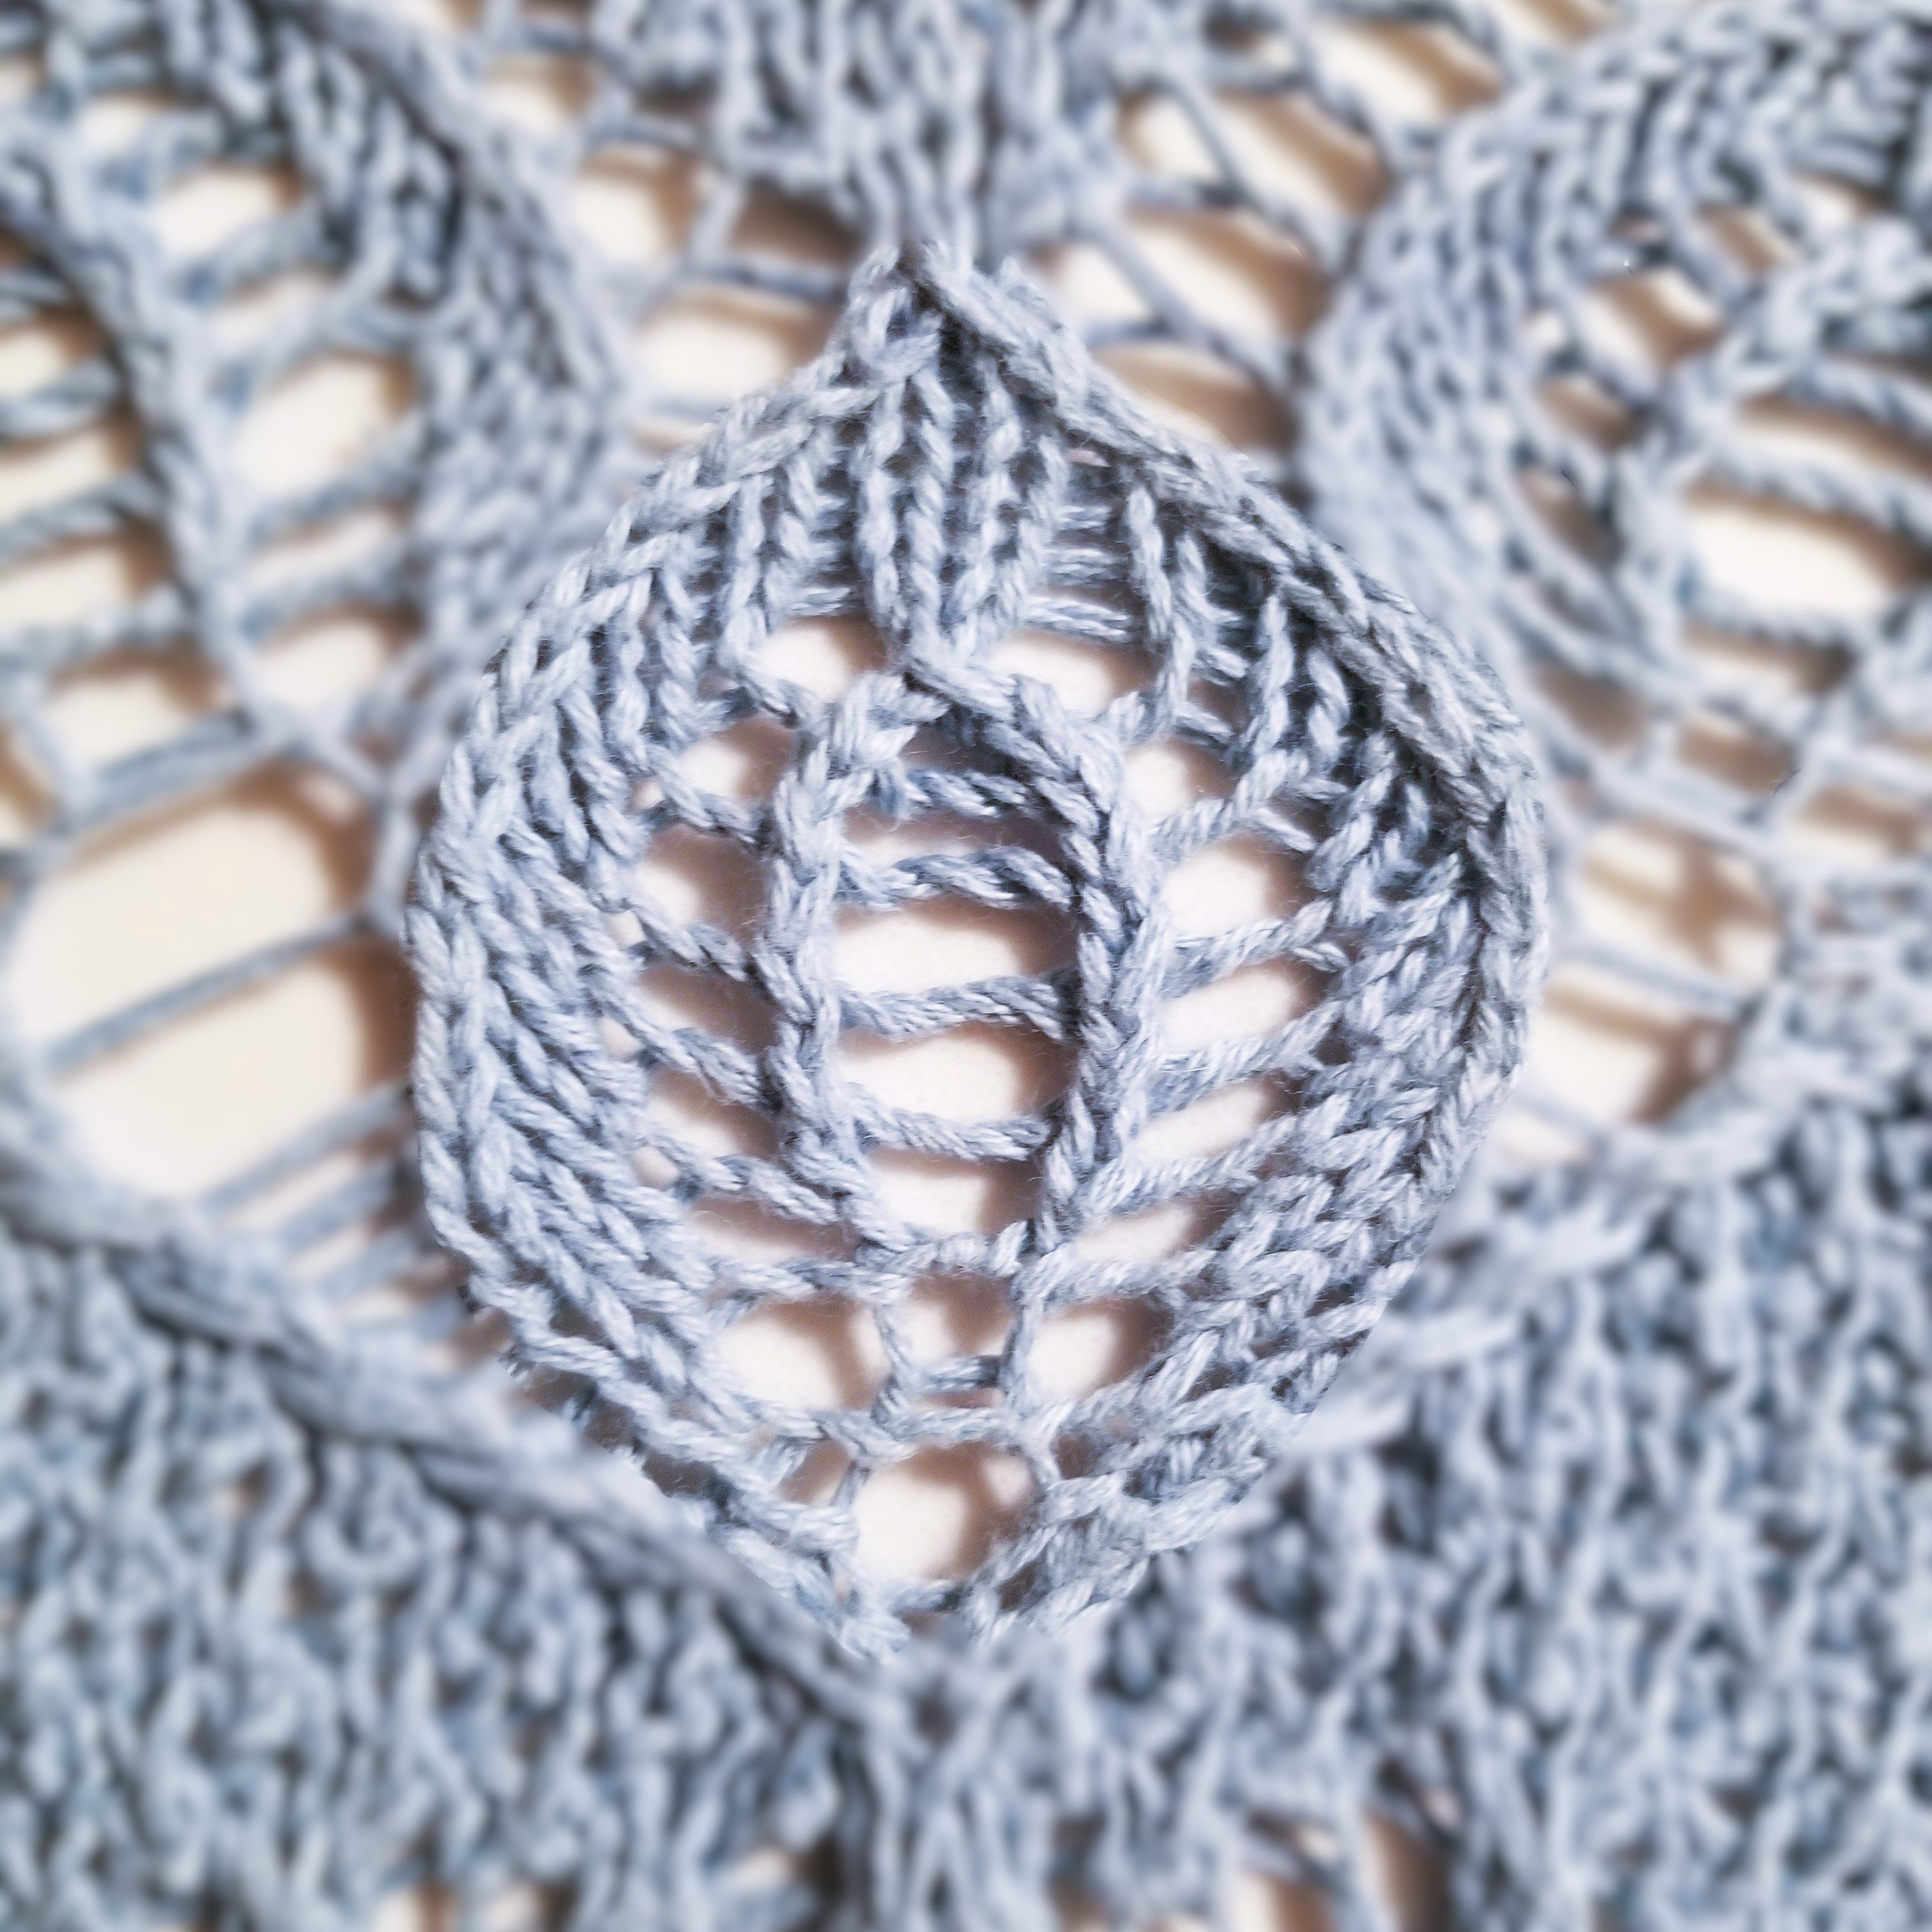
Let’s pick apart the individual stitches that make this pattern so striking and picturesque!
There are two places where we see a hard border, which creates the outline and shape of the feather:
Both of these are created using decreases (k2tog and skp).
Knitting 2 stitches into 1 creates a line which is distinctly heavier than the surrounding stitches.
Also, we see that the direction of those decreases is towards the center of the feather.
This creates the desired curvature of the feather’s outline as the stitches lean in the desired direction.
And finally the feather is “closed” at the top by a double-decrease (sk2p) which collapses the left and right borders into a single stitch, creating the “point” at the top of the feather. Note that this same “closing” stitch is used to complete the inner section in the same way.
Yarn-overs are used here to great effect, as they provide a looser “hollow” texture to the inside of the feather.
Since decreases were used to created the hard lines, as mentioned above, there is, of course, a need for increases to prevent the feather from shrinking after every row. The specific choice of yarn-overs, as opposed to another less “holey” increase, creates the holes inside the feather and produces a notable internal pattern, rather than a simpler “filled-in” texture. Specifically in the inner “mini-feather”, the use of double yarn-overs makes the center feel very open and airy, as there is a larger gap between the two decreases.
The double yarn-over in the center is directly adjacent to the surrounding decreases, so the inner section is “self-contained in that sense. The increases are done immediately next to the decreases, so the rest of the feather is unaffected.
Note that there are also yarn-overs happening just outside of the “mini-feather”. These yarn-overs are increases intended to balance the decreases forming the outline of the overall feather.
Since these yarn-overs happen away from the outline decreases, the knit stitches in-between have a distinct slant towards the outline of the feather. This is because the outline decreases are “eating” the knit stitches, pulling the knit stitches towards them, causing an outward “flare”. The new stitches that replace the “eaten” ones are produced in the center, which further accentuates the inner “mini-feather”, as the hard inner lines are boldened by the yarnover gaps on either side of them.
Reflecting on the construction of the feather, I can imagine using the same idea to produce any other self-contained shape as desired. Just use those decreases (k2tog and skp/ssk) to form a hard outer border. Perhaps also use them to make lines inside the shape. Then just supplement those with increases to balance the decreases. Yarn-overs can be used as the increases to produce holes and add texture.
I shall keep this in mind in the future… Thank you for the lesson, Swan Shawl 🤝
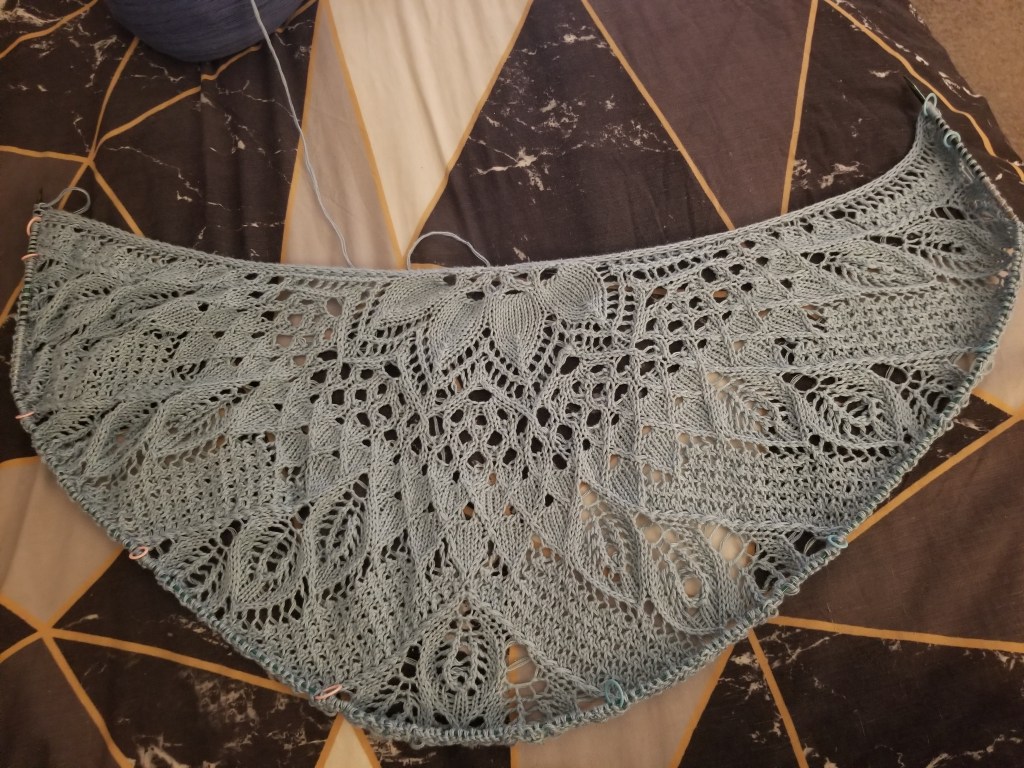
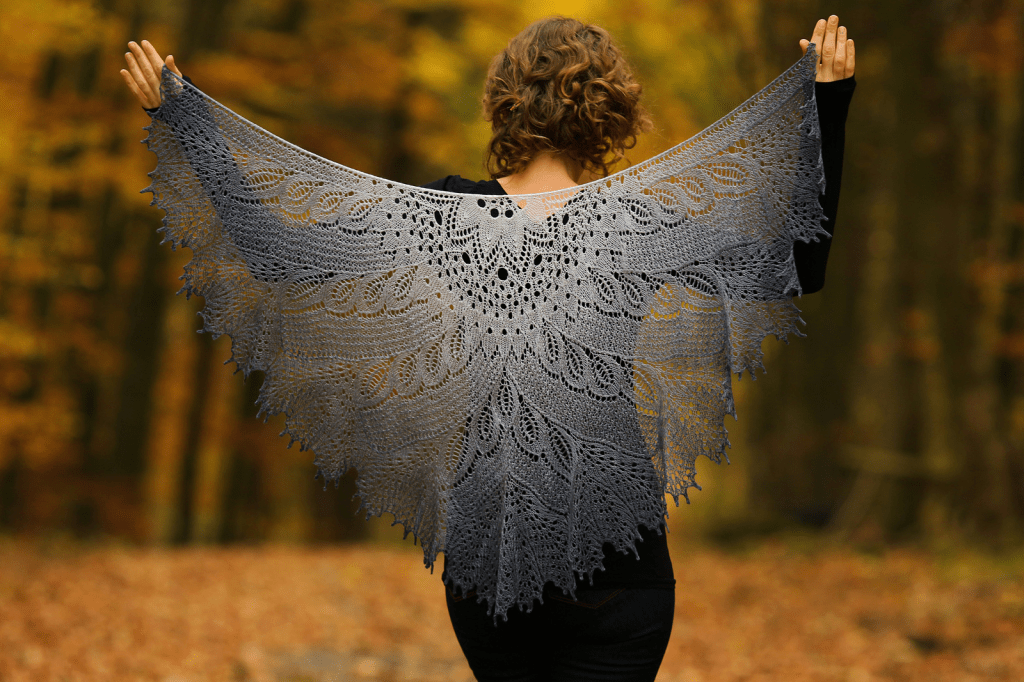
The 🦢 Wild Swan Shawl 🦢 is officially 🎉🎉COMPLETE🎉🎉

… and it’s definitely one of my favorite pieces so far 😊
After my last post, I only had one section of the pattern left (section G) before binding off. There was an option to end after any WS row in that section, but I thought I might as well use as much yarn as possible 🤷, so I just went through the rest of the pattern without ending early.
The last section was simple repeats of lots of yarn-overs and decreases (below).
This is what produced the many “feathers” at the outer edge of the shawl.
The bind-off turned out a bit funky for me, but I think it came out fine in the end.
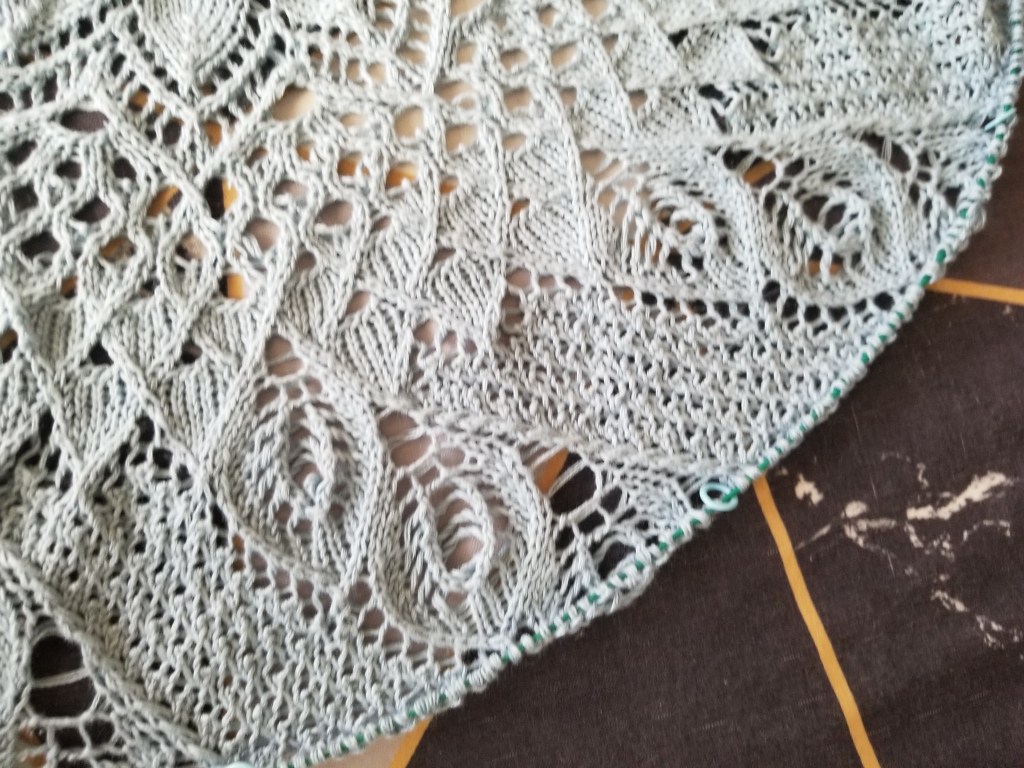
On the tips of each of the feathers, there were three picots (small, large, small) to accentuate the tips.
I hadn’t done those before, but the idea is essentially that you cast-on some number of stitches and then immediately bind them off, creating a mini-lump of yarn in the middle of the bind-off. It took me a few tries to get it to look right. I for sure was doing them wrong on the first few. Those were side-shifted by 1 st. I don’t think it turned out to be super noticeable with all the rest of the intricacy, but definitely sad about that 😔
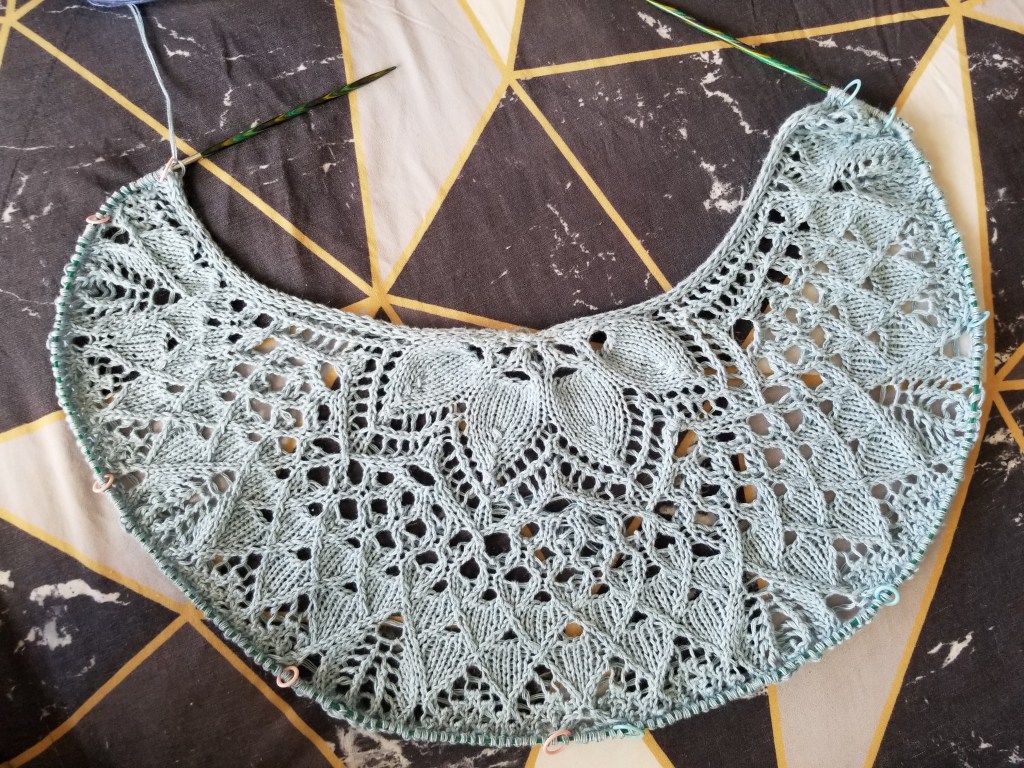
After binding off and weaving in ends, this is what the shawl looked like before blocking:
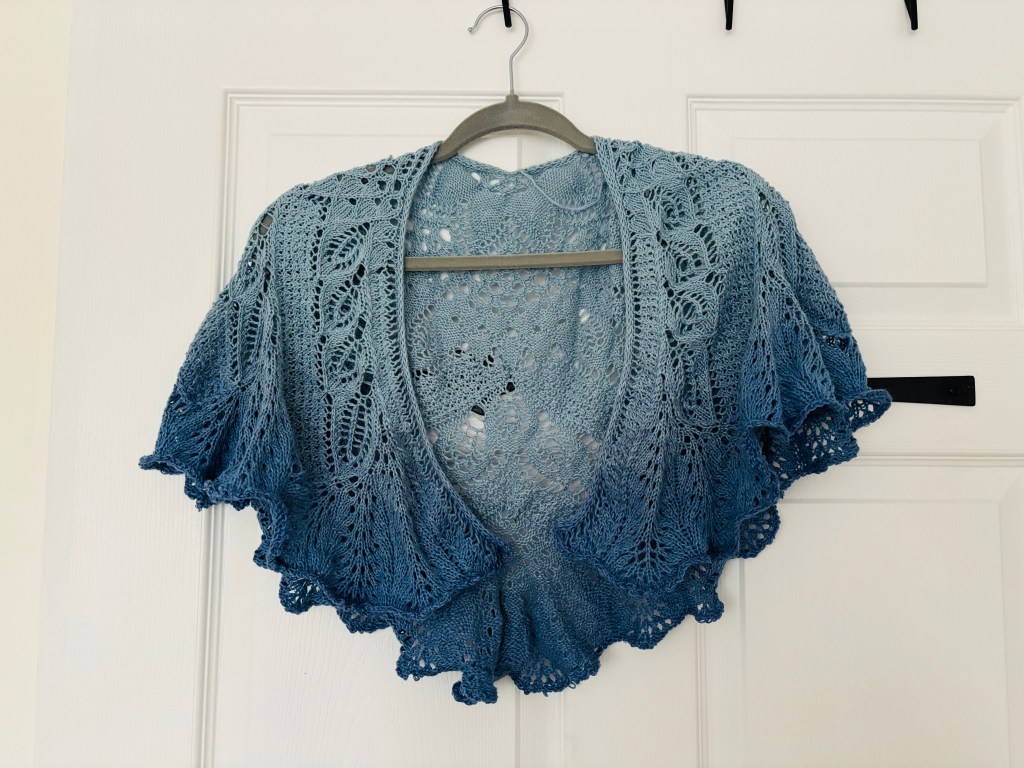
For a piece like this, where the geometry is a primary feature, the blocking is a very satisfying step.
Here’s a few pictures of the blocking:
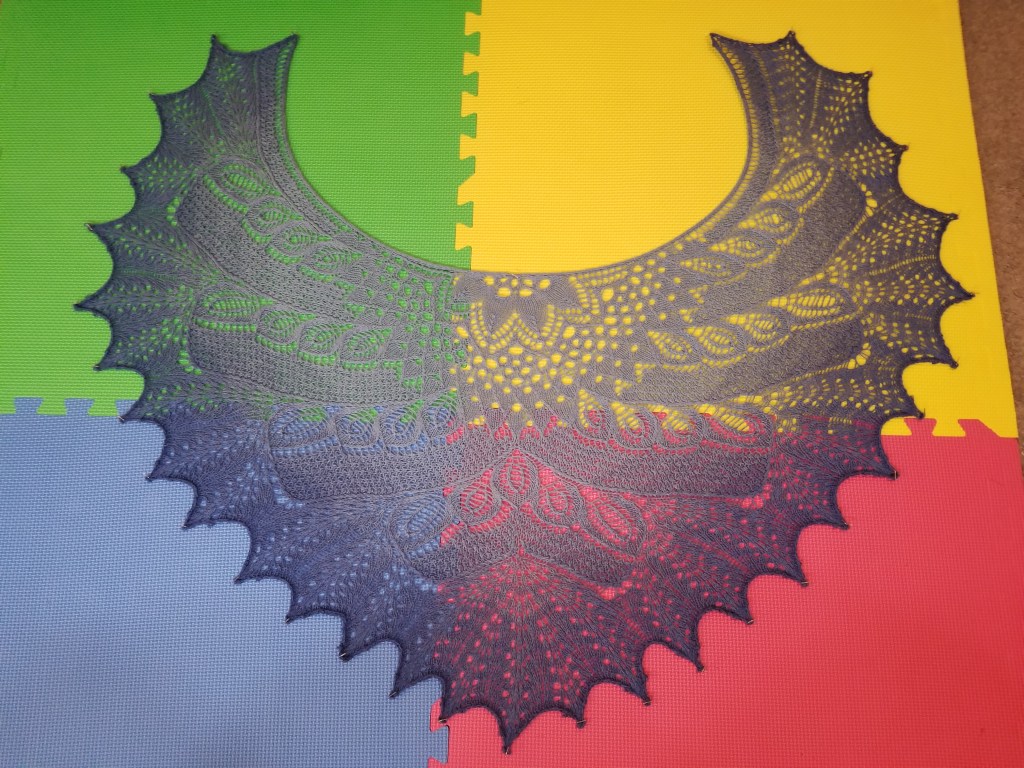

I knew, from a triangular shawl I’d done previously, that the blocking was necessary to shape it properly. My main aims with the blocking were the following:
Once I pinned everything down and adjusted the shape, the crescent pretty much came out by itself 😊
I do still want to pick apart some of the visual elements (like the leaf/feather parts), so I may post again about it.
Anyway, I have to get back to my Aran sweater. Still have a sleeve left there… 😬
✨ TODAY ✨, we’re drilling down on one of the design features of the swan shawl.
Since the design is somewhat advanced, I thought it would be useful to examine one of the design features in more detail. That way, we can understand what makes it look a certain way. Maybe I can even use it in one of my own designs (someday…)
Let’s get started!
Here’s a section of the shawl including the pattern in question:
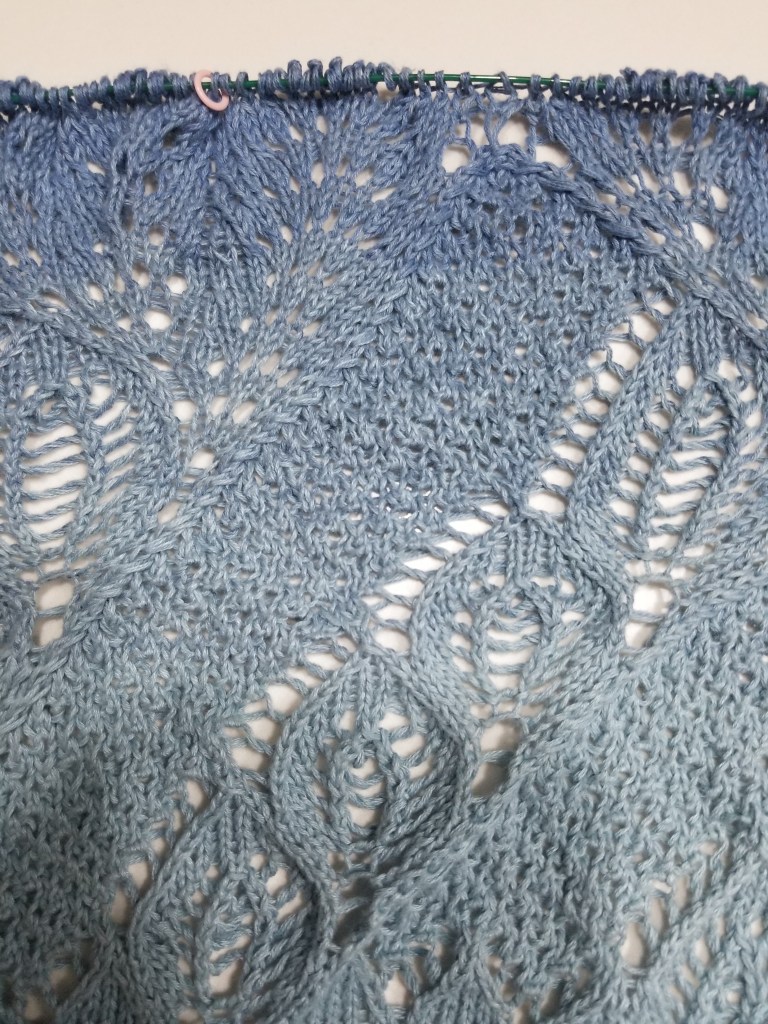
Now this is the specific part I want to talk about:

Notice the following:
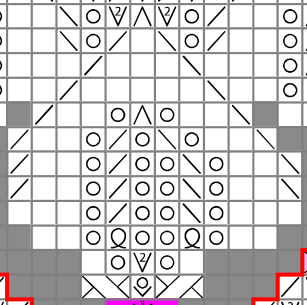
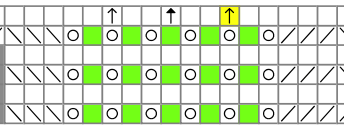
Here’s the chart (taken from the pattern), which produces that textured slant:
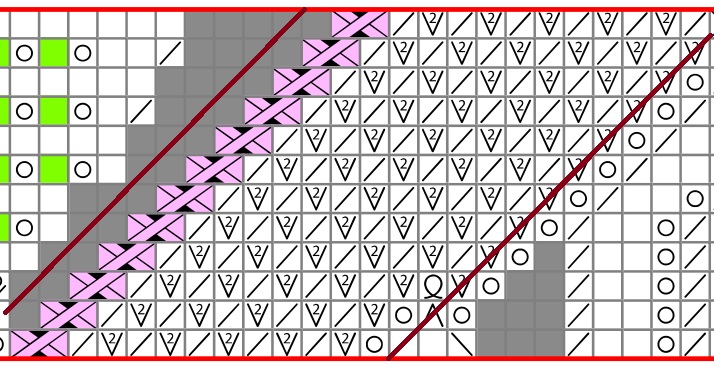
These are the stitches of import:


Now… let’s talk about how this combination of stitches produces what we saw above 🤔
Here’s the textured slant section again:
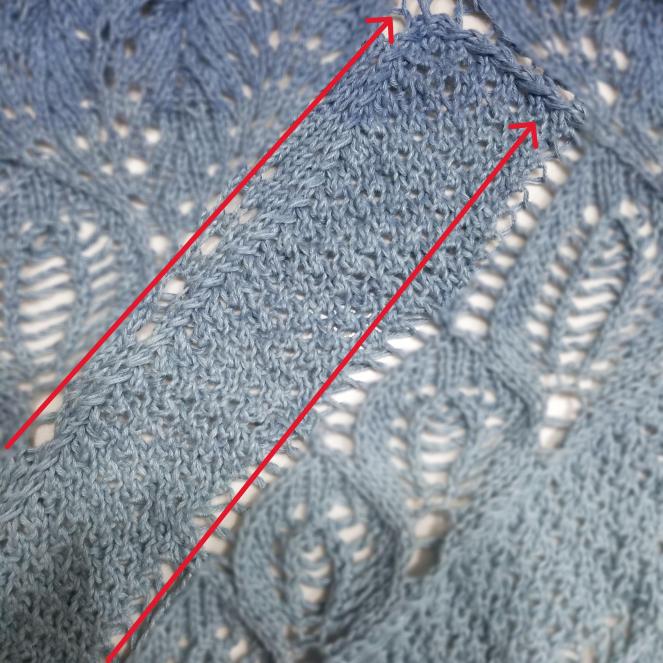
The left border of the section is something similar to a single-strand cable moving rightward.
Here’s the stitch again:

Here’s a better picture of what’s happening:
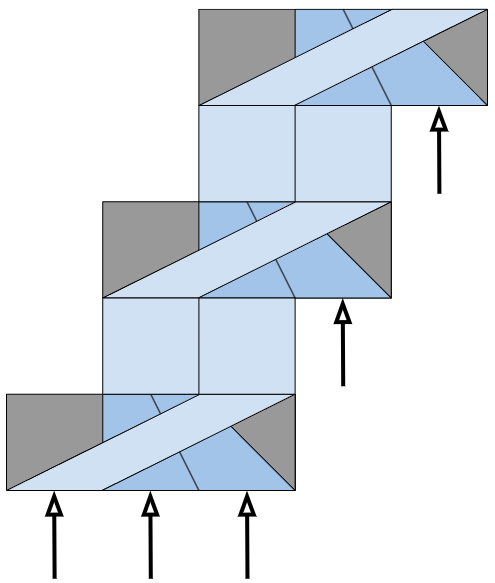
This cable causes a decrease of 1 stitch, so we start with 3 sts and end with 2. Of the starting 3, the left-most “hops” all the way right, over the other 2. The other 2 get knit together and scrunched into the center. So the left-most disappears, making the cable have an overall rightward slant.
Since this pattern continues, and we’ve decreased 1 of the original 3 stitches, we need a new stitch. So the next stitch to the right of the cable gets “eaten” and used to continue the cable’s rightward “hop”. The result is a nice rightward slanting border.
To the right of the border is the main body of the texture.
The stitch combination produces a “busy” effect similar to that of the moss stitch, where there are horizontal and vertical clashing to produce a sort of repeated chaos.
This is achieved by alternating the following two stitches:


On top of that, the pattern of repeated [KP, k2tog] is continually “walking” rightwards, as the aforementioned slanted border keeps “eating” stitches and thus pushing everything to the right. This adds an alternating aspect to the texture, since the stitches in a single column are forced to alternate, which is similar to how the moss stitch works.
I haven’t seen a cable like the one above, where it “eats” stitches and steadily walks in one direction. It definitely produces a nice effect, so I’ll keep that in mind for the future. Also, the body of the texture is pretty straightforward once you get used to those stitches, but it shows that simply alternating a couple of different-looking stitches can easily result in a visually-interesting and “busy” filler texture.
Anyway, I’m close to finishing the shawl, so I’ll report back soon on that 😊
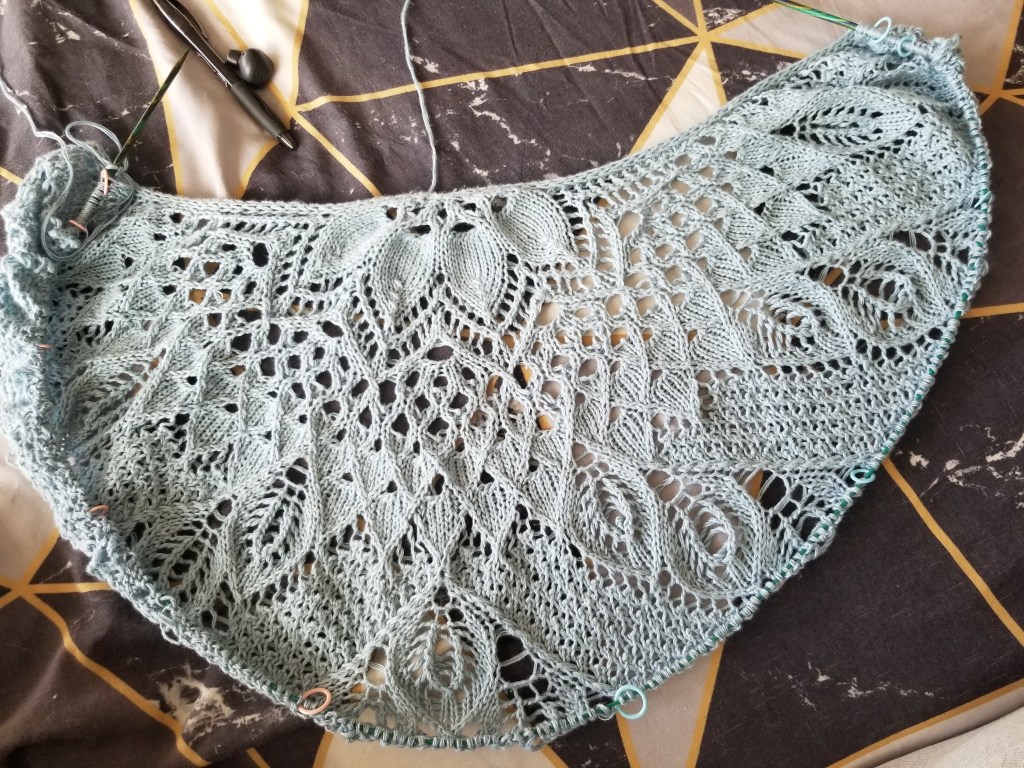
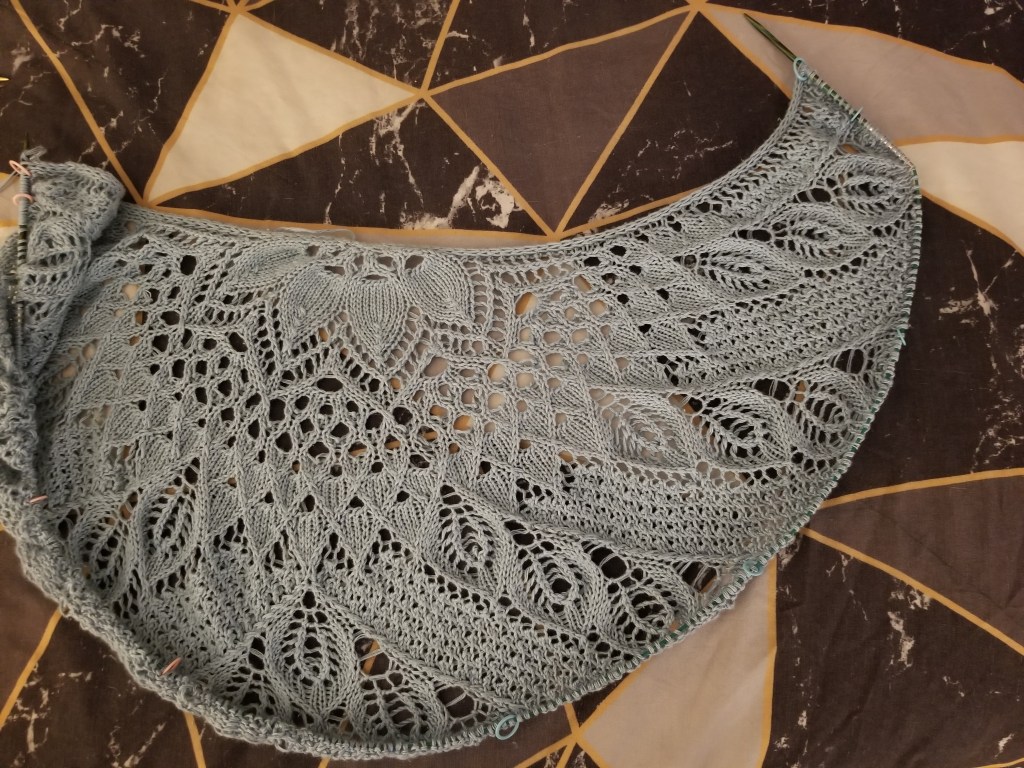
Here’s the state of the shawl as of now:
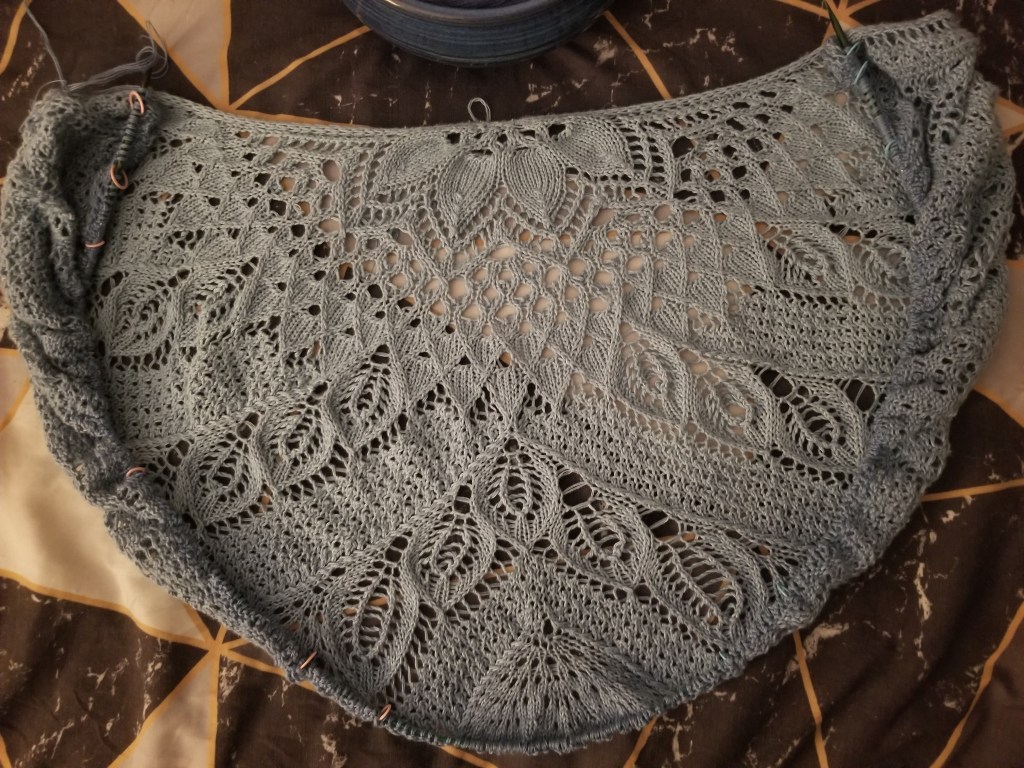
According to the pattern PDF, I’m at about 68% progress!
The pattern is split into sections labelled A through G, and I’ve just started chart F.
At this point, there’s an option to switch to a larger needle size, and I did choose to do that. I had been mildly worried about whether there would be a lot of leftover yarn, so this would be a good way to make use of more. Also, the gradient from light to dark blue happens over the whole yarn, so using more of it would show off more of that gradient as the shawl would end on a darker shade.
Speaking of gradients… the gradient FINALLY started showing up, which you can (kinda) see in the picture.
It looks like the color transition is going to come out pretty well 😊
That’s all for now — Will report back later with updates!
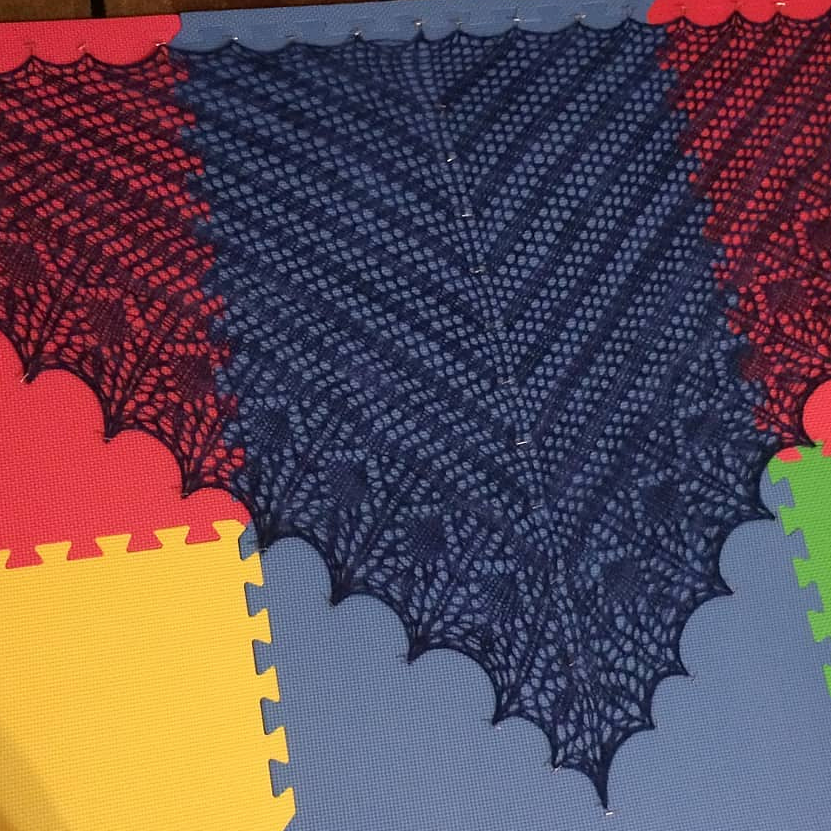
Since my last post about the Wild Swan Shawl, I’ve made a LOT of progress.
I’m about halfway done with it! (It definitely took some undoing and redoing of rows)
Here are some pictures of the progress along the way:
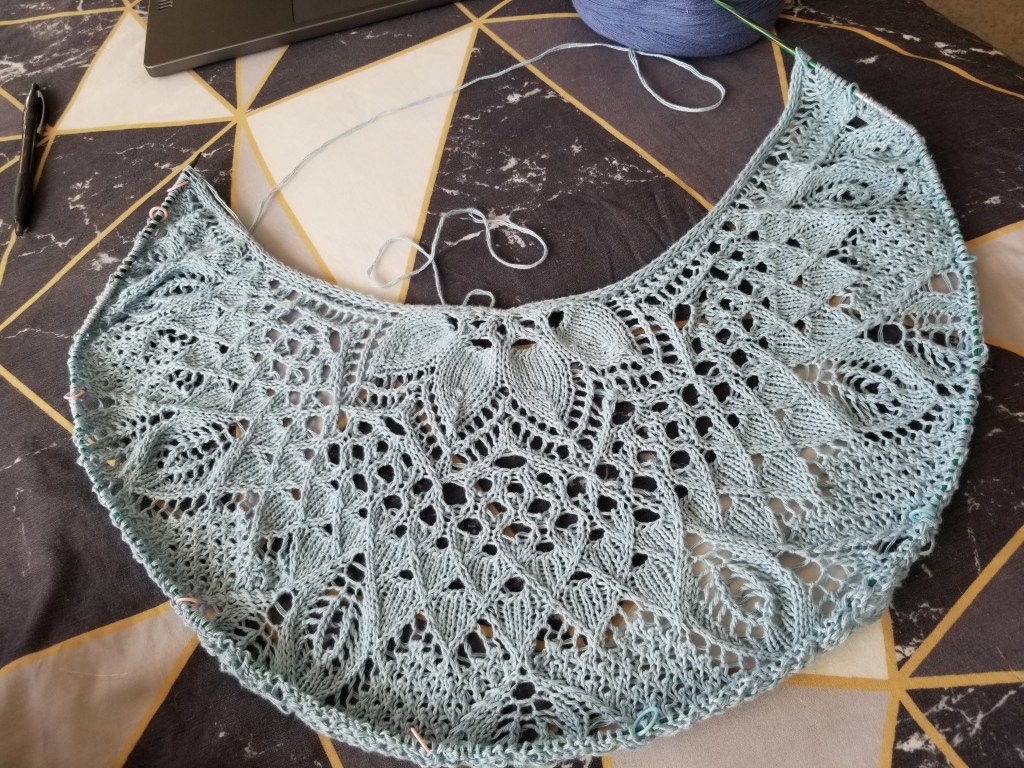
It’s definitely satisfying to see those feather🪶 / leaf🍃 patterns appear after you get past those rows!
The color gradient switching to dark blue hasn’t kicked in yet, but soon!
Lace patterns always have some interesting stitch combinations to produce those holey patterns. At the beginning of the PDF for this pattern, there’s a fantastic key explaining some of the stitch notations. Luckily they weren’t too crazy, as they were just extensions of common stitches, but they did take some learning.
Most of these were increases and decreases intended to produce different slants or other visual effects. Lately I’ve been paying more attention to why certain stitches are chosen in a pattern, and specifically I notice the left- vs. right-slanting incs/decs more, now that I’m paying attention.
Here are (most of) the increases/decreases appearing in the pattern:
| Notation | Explanation | Counting Effect | Visual Effect |
| yo | Yarn-over leading into next stitch | Increase 1 st | Add a new st, with a hole appearing under it |
| co | Backwards loop cast-on | Increase 1 st | Similar to yo, but easier to add many new sts consecutively |
| kyok | k, yo, k into next st | Increase 2 sts | Increases by 2 sts in a fan-like triangle radiating from previous st. Also has a hole appearing in the middle of the fan: \o/ |
| k2tog | Knit 2 sts together | Decrease 1 st | Right-leaning decrease |
| skp(sso) | Slip 1 knitwise, knit, pass slipped st over knit st | Decrease 1 st | Left-leaning decrease |
| ssk (not used in pattern) | Slip 2 knitwise (one at a time), then use left needle to knit 2 slipped sts together | Decrease 1 st | Same as skp(sso), but easier for some people |
| k3tog | Knit 3 sts together | Decrease 2 sts | Very right-leaning decrease |
| sssk | Slip 3 knitwise (one at a time), then use left needle to knit 3 slipped sts together | Decrease 2 sts | Very left-leaning decrease |
| sk2p | Slip 1 knitwise, k2tog, pass slipped st over | Decrease 2 sts | Double central decrease /|\ |
| dcd (?) | Slip 2 knitwise, k1, pass 2 slipped sts over | Decrease 2 sts | Double central decrease /|\ |
The specific decreases matter a lot to make the feather patterns turn out correctly. For example, the outer edges of the feathers have to “bend” inwards, like so: /~~~\. After you do a bit of the pattern, you get a hang for when certain sts are meant to be used. Since I was already familiar with the basic k2tog and ssk decreases, it wasn’t too difficult to pick up the 3-to-1 decreases, which just involve more sts being slipped and knit together.
Although I’d done this st before, I did have to look it up again online to get the hang of it 🤷
I found the picture guide on the Knit Picks website to be super useful here.
Once you figure out the motion to loop the yarn with the thumb and create a new stitch, it goes really quickly.
ONE WARNING:
When you work one of these stitches while passing on the next row, be really sure that you’re counting stitches correctly, because unworking one of these is really difficult. The stitch is usually tight to the needle, so it’s hard to wedge the needle into it to undo it if you make a mistake. Trust me, I had to undo a couple of rows after counting wrong, and it cost me a couple extra days of effort to fix 😭
Here are a few more pictures showing some of the patterns more closely:
Just one more half left to complete… Wish me luck!
I’ve recently picked up a new project!
It’s called the Wild Swan Shawl and the pattern can be found here on Ravelry.
I’m still working on the Aran sweater, and I have the sleeve, neckband, and seaming left to complete.
For the time-being, I’m putting that aside while I work on the shawl.
I’ve only done one shawl before, and you can see the project on Ravelry here.
It was a large (6 ft wide) triangular shawl with a few features:
I really enjoyed that pattern and still count it as one of my best outputs (even though it wasn’t perfect).
For this pattern (as with everything else I pick up), I was looking for some new challenge.
Filtering through some of the patterns on Ravelry, I ended up wanting some of the following:
I landed on the Wild Swan Shawl because it satisfied these needs!
Looking at the pattern PDF, you can see that it’s almost entirely written up using charts, and this makes sense considering the very pictorial nature of the pattern that wouldn’t be capturable with words alone.
I’ve used charts before, but not to this level, so I thought this would be another good challenge.
Typically, I’m not very adventurous in terms of yarn colors. For the most part, I use solid-color yarns and don’t prefer gradients, speckles, etc. However, this pattern seems to lend itself well to gradients, as it is knit from the center outwards. I asked around my knitting group for gradient yarns, and someone recommended looking at the yarn cakes from Hobbii to find good gradients.
After browsing a bit, I landed on Sultan (Kyanite) by Cotton Kings on Hobbii.
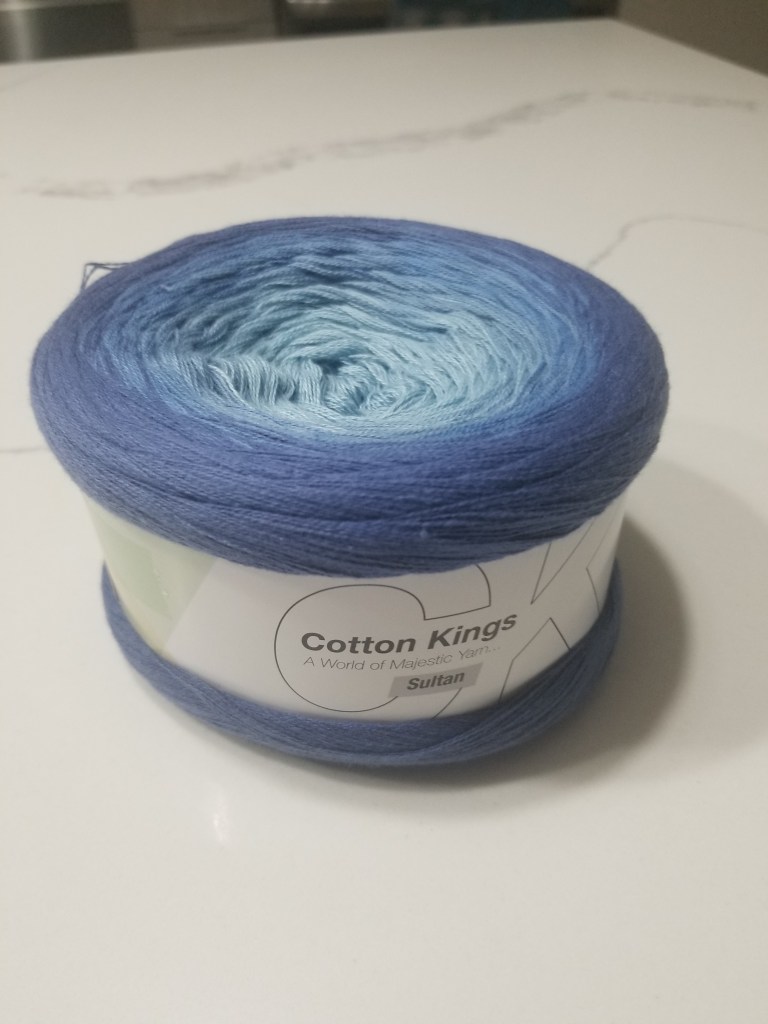
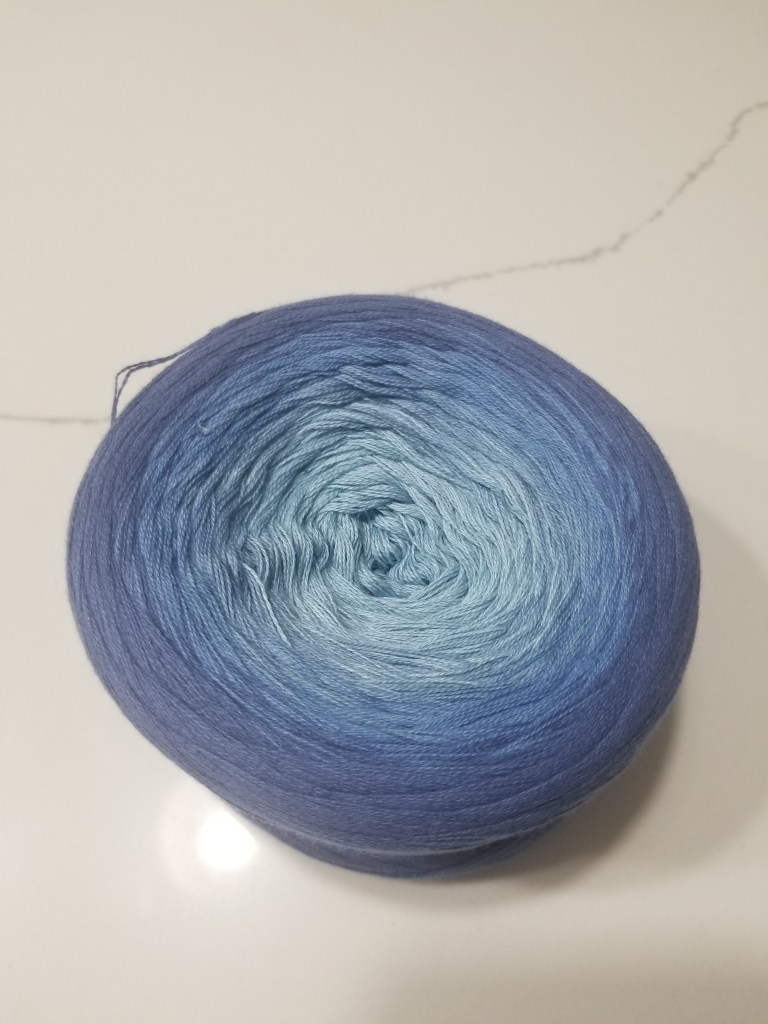
This should give a nice gradient from light periwinkle inside to darker royal blue/purple towards the edges.
Conveniently, this one yarn cake also has the right amount of yardage needed for the shawl, with some leftover.
The charts in the pattern PDF are a bit intimidating, as they’re very large and don’t seem to repeat much.
Hopefully things will go smoothly once I get into it!
